With Family Sharing, your entire family will be allowed to share all the iTunes and App Store purchases too without sharing the same Apple ID. You can use Family Sharing in such a way that the younger child will have to ask for permission before purchasing content. You will receive requests that you can deny or accept. So, below is how to get started with Family Sharing using your Apple devices.

Know About Family Sharing
- You can add up to six family members on a Family Sharing.
- Your device must be running on iOS 8 or above.
- All the added members get access to each other’s purchases.
- Once you purchase the family organizer’s iTunes account, all purchases after this will be charged from the organizer’s account.
- If the organizer decides to remove a member from Family Sharing, he/she will have access to every content that was purchased through his/her Apple ID.
Features of Family Sharing
- It allows you to share music, movies, books, TV shows, and any other purchased content.
- You can easily share photos with other family members through Family Photo Streams.
- Family members don’t need to worry about where you are, as you can share locations.
- Have your calendars along with the shared family calendars.
- Children under 18 have to “Ask to Buy” from their parents before purchasing iTunes and App Store content.
This is How to Enable and Get Started With Family Sharing
The family organizer sets up Family Sharing. Being the organizer, this person you are the one will receive purchase requests, and more importantly, this person agrees to pay for all the purchases that anyone in the family group makes.
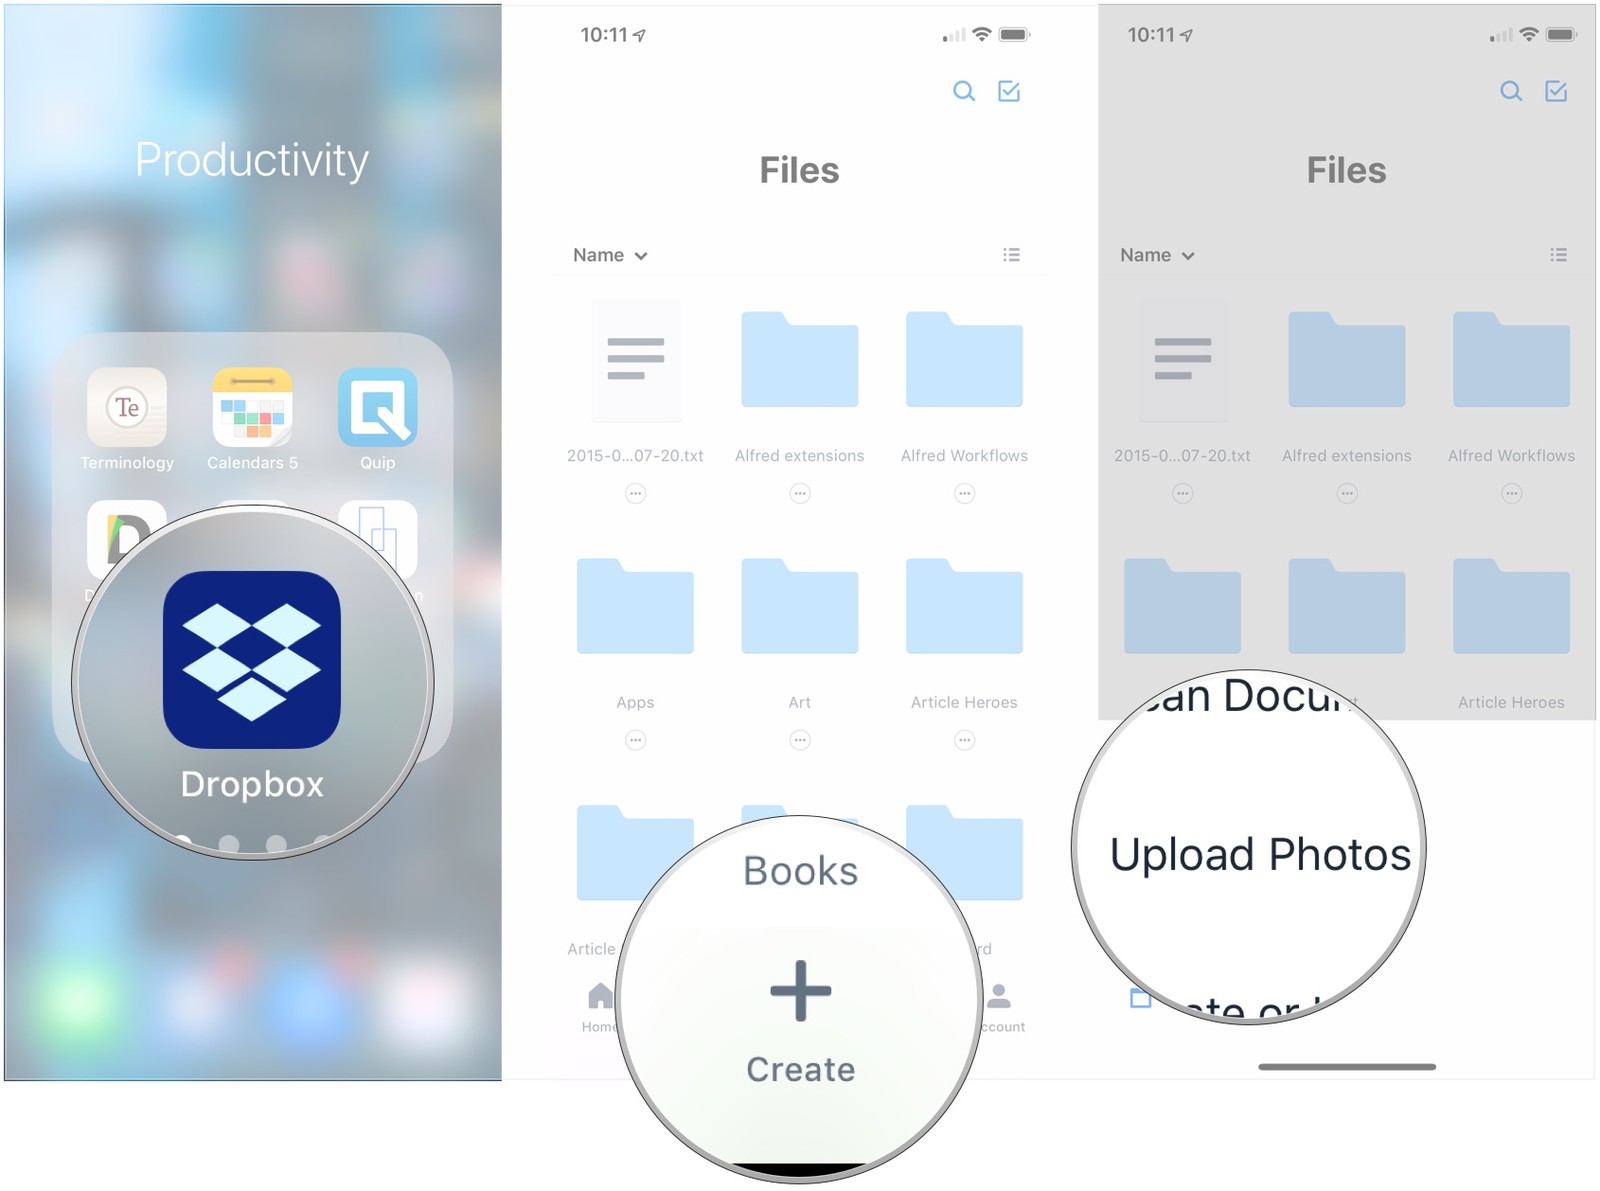
- Navigate to the Settings app on your iPhone or iPad.
- Open the Apple ID banner at the top.
- Select Set Up Family Sharing.
- Now, tap on Get Started.
- Keep tapping Continue on the prompts for Share Purchases, Confirm Payment Method, Share Your Location.
- Once done, you will be asked to “Add a Family Member.” Type the name of the person and tap on it to add a member.
- After this, you will be prompted to enter the credit card security code to verify that you are the organizer.
How to Accept a Family Sharing Invitation
- Navigate to Settings from your Home screen.
- Go to the Apple ID banner at the top.
- Tap Invitations > Accept > Confirm.
- Select Continue to share purchases.
- Choose to Share Your Location else tap Not Now.
How to Designate Someone As a Parent or Guardian
Note that only the family organizer can assign someone as a parent or guardian.
- Navigate to the Settings app on your iPhone or iPad.
- Go to the Apple ID banner at the top.
- Select Family Sharing
- Choose the person you would like to assign as a parent or guardian.
- Now, tap the switch next to Parent/Guardian to turn it on.
You are done! The new guardian will now receive purchase requests from any children. Note that this request can also be approved by another parent in the Family Sharing group.
Enjoy sharing content and purchases with the members of your Family Sharing!
Source : https://247kama.com/blog/how-to-set-up-family-sharing-on-iphone-and-ipad/


And if you have any kids in your home with any iOS device, then this is a great feature that will help you to manage their online activity.
It is a smart and ideal feature that can save you some money.
If yes, then this is the place where you will get to know all about this feature.
This task includes a procedure to follow.
Here, in this article, we have mentioned the processes for all Apple devices, including iPhone, iPad, and Mac computer.
So, to explore more, have a look at the below-mentioned steps:The Steps to Setup the Family Sharing on iPhone and iPadTo get started with the procedure of setting up Family Sharing on iPhone and iPad, follow the given below steps:Firstly, open the “Settings” app on your iPhone or iPad and then tap on your name given at the top of your device’s screen.And now, you will have to tap on the “Set up Family Sharing” option.Next, go through the option of “Get Started”.Tap on the “Continue” to proceed further.

If you are using an iPhone, go to settings, then click on general.
You will get a graph, which will show your colored information based on categories—for example, apps, systems, photos, and others.A lot of people do not know how to free your other storage.
You can also see storage full pop-up notification due to the limited storage.Other StorageIt is a cache for long-running files on your smartphone.
It should be automatically deleted by the system as soon as the user does not need it.These files sometimes get stuck in storage.
However, the app should be available on the play store.Backup And RestoreThe backup and restore feature is pretty accurate.
All the things will stay there after restoration.Connect to the Wi-Fi.Go to settings.Tap on your profile.Select the iCloud option.Select everything you want to see again after a successful restore.Tap on the iCloud backup option.Click on the backup now option.After the backup, you can restore your device.ICloud Backup StorageYou will only have a limited amount of iCloud backup storage.

There can be hundreds of reasons due to which you may face some problem on your iPhone.
Keeping this in mind today, we are going over five common iPhone problems and the things that you can do to fix them.
Technical Glitches and BugsLike every other Operating System in the market, iOS is also not completely free from bugs and glitches due to which you may face speed issues, net issues, performance issues, etc.
So, if you are facing these types of issues on your iPhone, then try restarting it.
Yes, it may look like dumb advice, but it can help you fix your mobile’s glitches and make it function normally again.
To do this, press and hold your phone’s home button and wake button together for almost 10-15 seconds.Poor Battery Lifeif you are facing battery issues on your iPhone, then try finding out all the apps/services that are draining your battery behind your back.

Gmails is the email service provided without charging a single penny from the users and is used by many people across the globe, it can be accessed by using any android or iOS device.There are various people who use it on iOS devices but some of them complain about the problem of Gmail not receiving emails on the iPhone.Make a Captcha resetIf you have added Gmail to your iPhone but you are not able to receive the emails on it then it can be one of the security features of Gmail that locks the account when a user is using it on a location not known to the server.The text above is a summary, you can read full article here

Discord is a great tool for online communication, which permits its users to have a conversation through voice, text, and video.
A number of gamers, mainly those who play PVM and PVP games, communicate with their teams using Discord.
You can become a member of the different types of communities which have the same interest as you.
To enable screen sharing on Discord, you have first to visit its online website.Steps to Set Up Discord Screen Share and Video Call• Firstly, go to the settings tab.• This procedure can be done by pressing on the cog symbol given to the right-hand side of the username located in the left corner of the Discord user interface.• Press on the App Settings option by going to the left side of the menu list.• Choose the Voice and Video option.• You can change the settings for both the voice and video conversation.• Go to the Video Settings column.• After that, choose the video camera by going to the pull-down list.• You need to choose the Test Video option located above the right-hand side of the display.• Check whether everything is working correctly or not to enable screen sharing on Discord.• In case you are using the Discord browsing application instead of the standalone client, then you have to turn on the camera cess by going to the context menu so that you can start using your device.• Press on the Allow option to verify the camera access.Steps to Add Friends to Your Call List• Go to the Friend List by pressing on the Friends option.• On that window, you can press on the friend username.• Otherwise, move the mouse cursor above the friend name, which will show the option for starting the Video Call.• By pressing on the name of the friend, the Direct Message window gets open on the desktop.• Over the Direct Message window, select to start the Video Call by pressing on the correct symbol.• In case you are an iOS or Andriod user, then begin the video call by pressing on the triple dot symbol located at the upper right-hand side of the display when you are in the direct message window.• Choose the “Start Video Call” option by going to the options menu list.Steps to Enable Screen Sharing on Discord• Press on the name of the friend with whom you wish to share the screen given on the left-hand corner.• Press on the phone symbol given near to the name of the friend for whom you want to enable screen sharing on Discord.• After the call interface gets open, then press on the screen share button which resembles a monitor symbol on the left-hand side of the screen.• Press on the screen picture given on the right-hand side in the center of the display.Enne Garcia is a self-professed security expert; she has been making the people aware of the security threats.
Her passion is to write about Cyber security, cryptography, malware, social engineering, internet and new media.
She writes for Norton security products at norton.com/setup.Source: https://quicksetupme.com/how-to-enable-screen-sharing-on-discord/

Just like other brands, Apple doesn’t provide any straightforward process to delete multiple contacts at once.
Still, if you are searching for an efficient procedure to remove certain contacts from the contacts list, then this blog is for you.
Here is how you can delete multiple contacts at once on your iOS device.Procedure to Delete Multiple Contacts at the Same Time using iCloudiCloud is the best cloud computing and data storage platform.
If you want to make changes to your contacts list, all the modifications will automatically reflect your synced devices.
To do so, you need to use the web edition of iCloud on your Mac.Follow these instructions to delete several contacts at a time via iCloud:At the start, visit the web page of iCloud via the link that is iCloud.com.Then, sign in to the account via Apple ID and Passcode.After that, choose the Contacts option by navigating the iCloud main page.Next, select and highlight the contact you desire to remove by tapping the Control key on the Mac.Now, scroll down the page and then choose other contacts to remove.Hit the gear-shaped icon from the lower left of your screen.Then, hit the Delete tab.If it asks for confirmation, press the Delete tab again.The selected contacts have been successfully deleted from all the synced devices.
In case you find the solution is slightly complicated for you, try a third-party iOS app to delete your desired contacts in one go.Procedure to Delete Multiple Contacts via GroupsYou can easily use the third party app “Groups” that provides advanced features via in-app purchases.Here is how to delete contacts with the Groups app:First of all, you have to download the Groups app directly on your smartphone.Then, open the app.Allow the app to access all your contacts when it asks to do so via prompt box.Choose the option “All Contacts” from the provided listing.Go through the contacts listing and then mark the contacts you desire to remove by hitting the circled-shaped icon located towards their name’s left-hand side.Hit the option “Choose Action” from the uppermost section.Then, press the option “Delete Contacts…” on the prompt box.Now, hit the “Remove from my iPhone!” option to verify your decision.Congrats!