Are you trying to use your recently purchased headphone with your Windows computer, but it is not working with it? Well, if this is the case, then you are in luck because we are going to show you exactly how you can fix this problem so that you can use your new headphones with your computer.
Preliminary Checks
There are a few things that you must check before trying anything else to fix your headphone’s audio. Why because these checks allow you to find the real cause of your problem so that you don’t waste your time on other troubleshooting tips to fix your headphone’s audio problem. Here are things that you must check before trying anything else if your headphones are not working with Windows:
- If you are using wired headphones, then make sure that the audio jack of your headphone is plugged in completely and properly.
- If you are using wireless headphones, then make sure your Computer’s Bluetooth is on, and your headphones are paired with your computer.
- Make sure that there is no dust or dirt in your computer’s headphone jack.
- Make sure your headphones are set as the default device on your computer.
- Make sure your computer’s audio or your headphone’s audio is not muted.
If these checks do not fix your headphone’s audio, then you can follow the rest of the troubleshooting tips.

Use the Windows Troubleshooter App
Window Troubleshooter is a built-in Windows app that allows its users to scan their computers and fix any problem that they might be facing on it. So, if your headphones are not working with Windows, then try using this app to fix this problem. Following are the steps that you can follow to fix your headphone’s audio using the Windows Troubleshooter app:
- Right-click on the sound icon (located on your taskbar).
- Next, hit the “Troubleshoot Sound Problems” option.
- Now, select your audio device (Your headphone) from the list and then tap on the “Next” button.
- Next, tap on the “No, do not open the Audio Enhancements” option.
- Now carefully follow all the on-screen instructions to fix your headphone’s audio.
Use the Audio Troubleshooter
Audio Troubleshooter allows its users to scan their computers and fix all common sound problems on them. Following are the steps that you can follow to fix your headphone’s audio using “Audio Troubleshooter”:
- Hit the start button and then press the settings icon to open the Windows Settings app.
- After that, tap or click on the “Update and Security” option.
- Now select the “Troubleshoot” option from the left-side menu bar.
- Next, tap on the “Playing Audio” option.
- Now tap on the “Run the troubleshooter” button and carefully all the on-screen instructions to fix your headphone’s audio.
Update Your System’s Sound Driver
If you haven’t updated your system’s sound card driver, then this might be the reason due to which you are unable to use your headphones with Windows. However, by using the “Device Manager” app, we can quickly install the latest sound card driver on our system and fix this problem. Following are the steps that you can follow to update your system’s sound card driver:
- Type “Device Manager” in your computer’s search bar.
- Next, open the “Device Manager” app.
- Now double-click on the “Sound, video and game controllers” option.
- Next, select your sound card driver and right-click on it and press the “Update driver” option.
- After that, select the “Search automatically for drivers” option and carefully follow all the on-screen instructions to update your sound card driver.
Roll Back Your Sound Driver
If you have recently installed a new sound card driver on your system, then this might be the reason due to which you are unable to use your headphones with your computer. However, we can easily solve this problem by reinstalling the old sound driver. Following are the steps that you can follow to reinstall your old sound driver:
- Type “Device Manager” in your computer’s search bar.
- Next, open the “Device Manager” app.
- Now double-click on the “Sound, video and game controllers” option.
- Next, select your sound card driver and right-click on it.
- After that, tap on “Properties.”
- Now go to the “Driver” tab and tap on the “Roll Back Driver” option.
Conclusion
These are some of the quick fixes that you can try if your headphones are not working with your computer. Yes, these fixes might look like a piece of dumb advice to you in the first place. But trust us, these tips can surely help you out and fix your problem in no time. So, make sure you try out these tips if your headphones are not working with your computer.
sourc :- https://trustjone.com/5-things-to-do-if-your-headphones-are-not-working-with-windows-pc/

Fortunately, a Windows computer doesn’t get slow with time.
If your computer did slow down, then there can be some reasons behind it.
In this blog, we will go through the various solutions to speed up your Windows PC.
Let’s get started.Source : http://macfeemcafee.com/how-to-speed-up-a-slow-windows-78-or-10-pc-for-free/

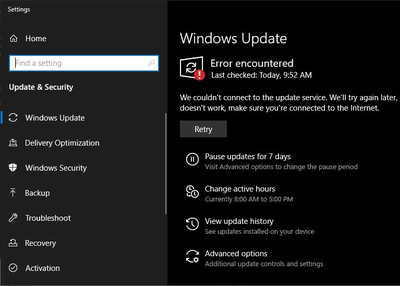
Error code 0x80073712 on Windows Update means a file is missing which is required in order to run the Windows Update.
It can also appear when the Windows Setup is missing from your computer or when it is damaged, which causes problems while installing Windows 10 Updates.
Source By : https://directorybuzz.co.uk/blog/how-to-fix-windows-update-error-code-0x80073712/The error code 0x80073712 on Windows Update might appear in the following situations:Some files that are necessary for Windows Update might be missing or corrupted.
We can download the update file once more to fix the broken file, and this will solve the 0x80073712 error code.
Solution 2: Use Windows Update TroubleshooterDownload the Windows Update Troubleshooter tool provided by Microsoft.
This tool is developed for troubleshooting issues on Windows 10 Update, and it can fix the issues automatically.


While trying to take printouts on Windows XP, an error message emerges signifying that the memory is not sufficient It may emerge before another error, which may be relating to a file missing, so locating and reinstalling that will Troubleshoot Printer Issues on Windows PC.
This can be as irritating as encountering and having to find a printer offline fix for Windows.


AVG PC Tuneup Crack extends the life of your old PC, and your PC works fast.
It is the essential part of our system, used for the maintenance of programs, and it also cleans your disk and browser that free up your storage.
It also speeds up Windows PC.
They also remove unwanted files to free up space.
You don’t need any software.
With one click, they maintain the speed of your PC.