


If you’re unfamiliar with the term High-Dynamic-Range, it is a technique used in imaging and films. It uses artificial intelligence to turn SDR into HDR. Moreover, HDR used in videos, such as movies and video games, is a game-changer. Now, if you’re a big Xbox fan, the Xbox X and S consoles support the auto-HDR feature.
In simple words, HDR is an upgradation to the display world that uses various colors and bright highlights to come up with a high-quality image. The format used by the Xbox X and S is HDR10; however, there are many other formats available.
Notably, a compatible device is required to view HDR. If you’ve recently bought a TV, it is likely to support the feature. Also, if you’re a potential buyer of the same, specifically for your gaming setup, make sure it supports the HDR feature.
One of the main components of a good HDR is a precisely adjusted calibrated display. It informs the console about the capability of a TV in terms of black levels and highlights. Interestingly, there’s an application for the same.
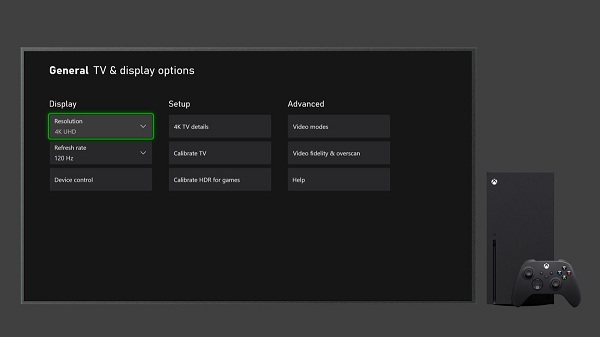
Before getting started, make sure that you’ve put your TV in Game Mode. Turn on your Xbox Series X or S and click on the Xbox button on the controller. Next, select the ‘Power and System’ option using the bumper buttons. Locate the ‘General’ tab in the settings menu, and select the ‘TV and Display’ option. Next, begin the process by selecting the ‘Calibrate HDR for Games’ option. Further, you’ll have to follow the on-screen instructions.
It is essential to note that if you ever switch to a different TV or a monitor, you’ll have to run the HDR calibration all over again. Finally, you can boot up games once you’re done calibrating.
According to a few people who tested the HDR tech, it worked fine. However, some games worked better than the others. There’s nothing that’ll trigger you to disable the feature. Not everyone likes the same thing, though; therefore, you can disable the feature anytime.
How to Disable Auto-HDR?
If you’re facing issues using the Auto-HDR feature, you may disable the same anytime. Notably, you can not set different settings for each game; thus, you’ll have to enable the settings if you want to use it in certain games.
The steps to disable the Auto-HDR feature are:
- Switch on the console and tap on the Xbox button on the controller.
- Locate the ‘Power & System’ tab and click on the same.
- Click on the ‘Settings’ button.
- Select the ‘General’ option from the menu.
- Tap on the ‘TV and Display Options.’
- Go to the ‘Video Modes’ section and unmark the checkbox for the ‘Auto HDR’ option.
Once you’ve followed the instructions mentioned above, restart the games to change the settings.
It was pretty easy, right? Using the Auto-HDR tech is an amazing option when you’re looking forward to bringing HDR visuals to older games. However, if you don’t want to continue using the same, you may disable the feature following the simple steps mentioned above.
John Smith is an inventive person who has been doing intensive research in particular topics and writing blogs and articles on mcafee.com/activate and many other related topics. He is a very knowledgeable person with lots of experience.
Source:- https://secure-goods.com/how-to-work-with-auto-hdr-on-xbox-x-and-s/


The to-be-released blockbuster home video game console by Microsoft is going to run the majority of games from Xbox One.
Ever since being announced at last year’s Electronic Entertainment Expo (E3 2019) as “Project Scarlett”, the console has been one of the most awaited products for this holiday season.
Thus, a rapid or rampant transition, which seems forced, will only tank the likeness towards the new console.
A smoother transition, with lesser compulsory or exclusive options, and more integrated setups and plans, will be more profitable long term.
Microsoft plans to create a subtle transition for gamers as their buyers move from the third generation into the fourth.THE CONSOLE IS GOING TO BE A BLOCKBUSTER!From what the company showcases in presentations and news releases, the console is all set to be a class apart from previous ones.
The Xbox Series X will be able to run all previous titles except those with Kinect technology.

At first, the team remained as tight-lipped as possible, and then when they disclosed some details by their social media posts and interviews, the information imparted was as limited as it could be.
As per the inference, it looks like the console may be available for purchase much before the people expected.
Sources :- Xbox Series X , Search-yellow Sony and Microsoft are headed to another face-off because the anticipated release time of Xbox Series X and PlayStation 5 is very close.
Fans got into comparisons of possible specifications and game options, to choose which alternative will likely be worth the money.
Tom Warren, a reliable source from a leading news website has disclosed that the release of Xbox Series X may be sooner than speculated dates.
He informed everyone that Xbox sales had boomed a lot this year (maybe because of house quarantine across the world).

The Xbox Series X and Xbox Series S upgraded controller comes with a share button that eases the pain of scrolling through menus for taking a screenshot.Earlier in E3 2019, Microsoft teased the name ‘Project Scarlett’ for their next project, but it was in December’s The Game Awards when we first heard about Xbox Series X and Series S gaming consoles.
Microsoft made some major upgrades in the Xbox Series X/S gaming consoles, but the major highlight was the controller’s share button that caught everyone’s attention.The Xbox Series X/S already made some headlines with its AMD’s Zen 2 and RDNA 2 architectures, which delivers true-to-life lighting and reflections effects that imitate real life.
But another thing that caught the tech enthusiasts’ attention was the new Share button.This new Share button is located under the Menu and View buttons.
It allows you to instantly capture a screenshot of the gameplay without searching through the menus or using any voice command.
Holding the share button for a few seconds allows you to take a 1080p clip of the gameplay up to 30 seconds.
You can also share the gameplay/screenshot using the all-new Xbox app for android that shares the image/clip to your friends, family, Xbox game feed, and your social networks.Earlier in the Xbox One and 360 controllers, taking a screenshot was a hassle.

Grand Theft Auto 6 is still under process at Rockstar Games to launch it on PS5 and Xbox Series X.
Honestly, video-game fans are dying to see its arrival to next-generation consoles.While a lot of fans were hoping to see its launch during the PlayStation’s big PS5 reveal event in June, it didn’t come and fans returned home disappointed.
Rather, the recent announcement says that an ‘enhanced’ edition of GTA 5 has been ascertained to launch by the end of 2021, the release of GTA 6 and its feature on PS4 and Xbox One seems far.
However, it is hoped that whatever the next big release of Grand Theft Auto turns out to be, it is much more likely to be a next-generation console exclusive.That said, the chances of seeing the game launch anytime soon is very unlikely.
The gamers probably have to wait for approx more than a few years at the best.
However, there are big chances that gamers can witness this great release’s teaser or trailer drop at some point in time this year.


