


Whenever the spelling, as well as grammar checking tool, doesn’t work the way it normally works in Word, the reasons behind it can be any. Just a change in setting can solve your problem.
Remember! The given below steps shall be applicable for Word 2019, 2016, 2013, 2010 as well as Word for Office 365 users.
The method of using Word’s spell and grammar tool
- Firstly, press the Review tab.
- Then, press on Check Document or else Spelling and Grammar. It shall be present in the Proofing group.
- After that, opt for correcting or ignoring any errors the checker gets in the file.
Have a look at the Spelling and Grammar settings
- Firstly, choose the File tab.
- Then, choose Options. It is going to be towards the end of the left pane.
- Next, choose Proofing.
- After that, ensure to check the spell box.
- Then, choose to Recheck if you want Word to do a spell check on the present document whenever closing the dialog bar.
- Lastly, press on ‘OK’ for applying the modification and for closing the dialog bar.
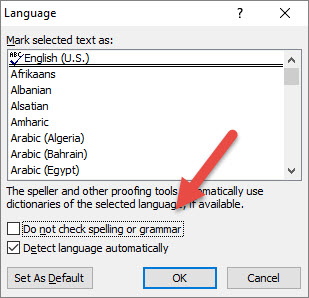
Have a look at the language settings
- Firstly, put the cursor inside the file you wish to check.
- After that, put the combination of Ctrl+A for choosing the complete document.
- Then, choose the Review tab.
- After that, choose the Language pull-down. It shall be in the Language group.
- Next, choose Set Proofing Language. Note that the language dialog bar shall open.
- Then, choose the language that you wish to use.Ensure that you choose the correct region.
- After that, click on ‘Do not check spelling or grammar’ for removing a checkbox.
- Next, choose OK for applying the notifications.
- Then, close the dialog bar.
- After that, tap the F7 button in the document for testing the spelling as well as a grammar checking tool.
- Note that if it is working, then you need to go back for the Set Proofing Language setting.
- Then, ensure the preferred language has been chosen.
- Next, choose ‘Set As Default’. It shall be towards the left-hand section of the dialog bar.
Go through exceptions
- Firstly, go to File.
- Then, press on Options.
- Next, choose the Proofing tab. It shall be towards the left-hand side of the Word Options.
- Ensure that every checkbox is not-ticked in the Exceptions for a section towards the end of the window.
- Lastly, tap on ‘OK’.
Devin Smith is a creative person who has been writing blogs and articles about cyber security. He writes about the latest updates regarding mcafee.com/activate and how it can improve the work experience of users. His articles have been published in many popular e-magazines, blogs and websites.
Source:-http://macfee-activate.com/fix-microsoft-word-spell-check-is-not-working/


Office Setup - Microsoft Word is the most used word processing program.
It is incredibly advanced and easy to work on.
Loads of formatting options are available.
You can add graphs and charts to the document.
Microsoft Word has an inbuilt thesaurus, spell check, and grammar tool.


We all want to manage our work in the flow and schedule, to manage our work properly, if you have any issue regarding schedule you can check weekly schedule template


