


I am trying to complete the HP Laserjet p1102w Wireless Setup Mac, but unable to do so. What should I Do? Well! Setting up your printer for a Mac device is not a difficult process. All you need is to follow the guidelines step by step carefully to make sure that you complete the setup without any trouble. In this post, we are sharing the easy instructions that can help you with the HP Laserjet p1102w Wireless Setup for your Mac device.

So, read on and follow the simple steps to complete the process.
Step by step Instructions to Complete HP LaserJet P1102w Wireless Setup Mac
Gather the details like “Network Name” and ‘Passphrase”.
Now, you need to connect the USB cable to your USB port on the printer rear and to your system.
Check and make sure that your router firmware is updated.
Go to the ‘Software and Driver Downloads, enter the name of your printer and hit the ‘Enter’ button.
Click on the ‘Apple’ menu and choose the ‘System Preferences’.
Based upon the operating system version, click on the ‘Print and Fax, Print and Scan, or Printers and Scanners option.
Click on your ‘Printer Name’ and choose the ‘Option and Supplies’.
Click on the ‘Utility’ and then choose ‘Open Printer Utility’.
Click on ‘HTML Config’ to open the ‘Advanced Printer Settings’ window.
Click on the ‘Networking’ tab and choose ‘Wireless’ in the left pane.
Click on the ‘802.11b/g/n Wireless’ and choose ‘Enabled’ from the pop-up appearing on your screen.
Double click on the name of your network to add it to the ‘Current Network Name’ field. After this, type ‘Network pass-phrase’. Hit the ‘Apply’ button.
Add the name of your network to the ‘Current Network Name (SSID)’. Type ‘Network Passphrase’.
Now, you need to disconnect the USB cable from your printing device and the Mac device.
In the ‘Printer and Scanner’, Print and Scan’, or ‘Print and Fax window’. Click on your Printer name and hit the ‘Minus’ sign, and delete the ‘USB Installed’ printer.
Click on the ‘Plus’ sign and click on the ‘Add Printer or Scanner’ option.
Click on the Printer name and click on the ‘Use or Printer Using’ box.
After that, choose the printer name from the pop-up appearing on your screen.
Click on the ‘Add’ option to add the printer.
Important: If you don’t know the network name and password, you need to find the WEP, WPA, WPA2 password.
So, these are the simple guidelines that can help you with the HP Laserjet p1102w Wireless Setup Mac device. All the given instructions are simple and easy to follow. But, if you have a doubt or there is any other query hampering your experience, you can contact the printer experts and take their advice. The experts can share the best possible solution to your problem and make sure that nothing hampers your experience. So, get in touch with the team of professionals and take their advice to mitigate the issue.


Canon is considered as one of the top-most choices of the people when it comes to choosing the best brand for the printers.
If you need assistance about the ij.start.canon/setup, then take the help of the experienced technical professionals.
In this blog, you will get to know how to connect your brand new Canon printer to the WiFi and other required devices.
Step By Step Guide To Connect Canon WiFi Printer To Laptop • Before beginning with the setup process of the Wireless Canon Printer to a laptop, always ensure that your Wi-Fi router must be turned on and in good working condition.
• As soon as the downloading process gets completed, you have to double-click on the driver software.
Then follow all the on-screen instructions to set up on the PC.• Now navigate to the ‘Control panel’ from the ‘Windows Search’ option.• Choose the option ‘Device and Printer’.• Then tap on the control panel in the computer system and after that click on the view devices & printers.• In the next step, tap on the ‘Add Printer’ button available on the top right corner.• Now you need to select your Canon printer from the shown list of the printer.• Tap on the ‘next’ button and then you can wait for a few seconds in order to finish the wireless connection on the PC.• By following all the above-explained steps, the Canon printer wireless connection with the PC has been completed successfully.

Samsung MirrorLink, like Apple CarPlay and Android Auto, allows you to hook up your smartphone to your compatible infotainment system and use a range of apps, such as music and navigation, safely.
Initially a development project by Nokia, it led to the formation of the Car Connectivity Consortium, which brought together major players in the automobile and mobile phone industries, certifying apps and devices that are both useful and safe for drivers to use.How does MirrorLink work?As with CarPlay and Android Auto, simply plug in your smartphone to your car’s USB port via USB cable and the infotainment system will automatically sync data from the phone.
The home screen is very similar to Apple CarPlay, offering large easy to touch icons and similar functions.Samsung MirrorLink works with CarmodeStub App that give you more control other features as compared to other MirrorLink devices.What makes MirrorLink stand out is that it’s open source, meaning that mobile phone developers can adapt it to suit their own models.
An app may need to be downloaded so that you can use MirrorLink depending on the make of your phone.What apps work with MirrorLink?Results may vary, but when we tested MirrorLink using a Samsung Galaxy S8, we found the functions very limited compared to CarPlay and Android Auto.
Google Maps is currently not compatible with MirrorLink, so you have to download a navigation app called Sygic, which we recently reviewed in our Free Navigation Apps blog, though you have to pay for the premium version to use it with MirrorlinkBy default, music is accessed through Google Play, though you can download an app called RockScout that’s compatible with popular music apps like Spotify and enables you to control the app via MirrorLink.Text messages can be accessed and you can dictate your messages through voice control.
You can also customize a widget screen for quick access to apps; music, weather, contacts or calendar.Which cars support MirrorLink?The official MirrorLink website offers a partial list of cars that support MirrorLink and also lists apps and smartphones that support it.
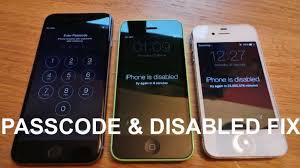
The “iPhone is Disabled ” error can occur when you enter a wrong passcode many times on your iPhone.
You can unlock a disabled iPhone by restoring it, which can be completed by using iTunes and iCloud on your iPhone.
Here’s how to unlock a disabled iPhone.Here’s how to unlock a disabled iPhone through iTunes• You need to use that system which you have already synced with an iOS device.• Pair the iOS device to the system by using a USB cable.• If you do not remember the password to unlock a disabled iPhone and you were getting an option to enter the password, then you need to use any other system or move to recovery mode.• Go to the iTunes application.• Choose the device located at the upper left-hand side of the display.• Now, you will get the details about the iPhone.• You will get the Restore iPhone button in the center of the display.• It will remove all the files and folders of which you have already taken a backup.• Now, your iPhone will begin as a new phone.• Choose the Restore from iTunes Backup option in case you want to restore the iPhone.• Now, you have successfully unlocked a disabled iPhone.Steps to unlock a disabled iPhone through iCloud• Select the All Devices option given at the upper side of the display.• Choose the iPhone device from the given list.• Choose Erase iPhone option and after that, verify it.• Enter a protected password registered with Apple to restore the purchases you have made.• Now, all the files and folders get removed from your iPhone.• After following these steps, the iPhone will work as a new phone.• When you ask to select the backup option, then you need to choose the Restore from iCloud Backup option.
You have to choose a newest option.• It will take a few minutes to complete the restoring process of all the files and folders stored on the iPhone.• Make sure that you do not disconnect the iPhone from the charged and a Wi-Fi connection.Go through these steps to unlock a disabled iPhone via recovery mode• Open the iTunes application.• Start the iPhone again.• Keep pressing the volume up key.• After that, long press on the volume down key.• Keep pressing on the side key until you get connected to the iTunes.• Now, the recovery mode to unlock a disabled iPhone is started, and after that, you can select the Update option.• iTunes will start restoring the iPhone and trying to not remove the files and folder from it.• You need to wait for a few minutes.
In case this procedure does not unlock a disabled iPhone, then you have to follow the same steps again but choose the Restore option rather than Update option.• The iPhone will now work as a new phone, and you can take a backup from the iCloud or iTunes application.Source url:- http://sy-norton.com/how-to-unlock-a-disabled-iphone/Ava Williams is a Norton product expert and has been working in the technology industry since 2002.
As a technical expert, Ava has written technical blogs, manuals, white papers, and reviews for many websites such as norton.com/setup.


Check the connections between the printer and your computer.
If the device is attached via USB, switch to a different USB port on the motherboard to eliminate this as a possible cause of the problem.https://printers-setup.us/lexmark-printer-setup.html


