Office 365 migration API leverages Azure to boost migration speed and reduce the throttling effect to facilitate heavy migrations without affecting the performance.
Office 365 Migration API
SharePoint migrations became much easier with the help of third-party tools available in the market. But when it comes to SharePoint online migrations, performance and throttling issues are always primary concerns no matter which tool we use. Because of this SharePoint throttling effect, sometimes SharePoint sites will also become unavailable and causes poor performance to the users accessing the sites.
To address these issues, Microsoft came up with separate API for migrations named O365 Migration API. This API leverages Azure and boosts the migration speed like ever before and the throttling effect will be greatly reduced, so users can use SharePoint sites without any performance issues even at the time of heavy migrations.
How Office 365 migration API works
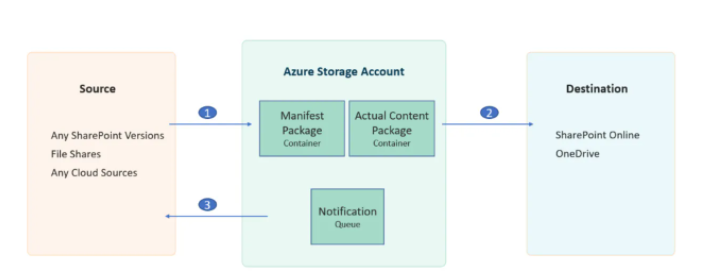
To explain it in a simple way, you will export your content as a package and submit it to Azure. The timer jobs in Azure will pick your content and migrate them to SharePoint Online.
Let’s review the process:

- Prepare a package (Content Package) of items/files that you wish to migrate and another package (Manifest Package) of XML files that define metadata, relations, and settings for your migration. If this sounds complex, do not worry We will soon see what they are and how easily we can generate them.
- Once the packages are ready, simply push them to the Azure Storage account and start the migration job.
- Before starting the job, a queue should be created and associated with your package.
This can be easily done using the available API commands. When the migration job gets started in Azure, this queue holds the Job progress information.
- Timer Jobs in Azure will pick your content and push them to target SharePoint Online.
- During this process, the migration job progress and status messages will be written to the queue.
You can either read the messages in the queue to track the success or failure of your migration or you can simply get the job status using the available API commands.
Once the migration is completed, you can delete your packages from Azure.
We just saw the migration process. Now we will see how this can be achieved using available API commands.
We can either use the CSOM version of Migration API and code in C# or use the PowerShell one.
To simply explain the process, I will show you how we can migrate the Library Items from SharePoint 2013 to SharePoint Online using SharePoint Online PowerShell cmdlets.
As of now, Office 365 Migration API does not support the migration of site/list schema. Only content like files, folders, and items can be migrated along with its metadata, unique permissions, and versions.
So, to migrate the content using this API, initially, a List/library with columns should be created at the target.
Steps to use PowerShell cmdlets to migrate from SharePoint 2013 to SharePoint Online
Before you begin
- Create an Azure Storage Account
- Install the SharePoint Online Management Shell
Step 1: Setup your working directory
Step 2: Export your SharePoint List/Library content as a Content Package
Step 3: Generate the Manifest Package
Step 4: Submit packages to Azure Storage Account
Step 5: Start your migration job
Step 6: Monitor your migration job
Step 1: Setup your working directory
- Set up your working directory by creating two empty folders in SharePoint 2013 Server.
- Create a Temporary package folder. (To store content package)
- Create a Final package folder. (To store manifest package)
Let’s name the Temporary package folder as a source-package and the Final package folder as a target-package. (you can use any names. This is just for reference.)
Note: To simply explain the process, I am breaking the code into multiple steps. So, make sure you run the code in the same PowerShell console otherwise you may end up with “Not Found” exceptions.
Step 2: Export your SharePoint List/Library content as a Content Package
- Export your SharePoint Library Content as a Content Package to your source-package folder in your working directory by using the Export-SPWeb cmdlet.
- Run SharePoint Online management Shell as admin and run the following commands substituting your values:

Once the command executed successfully, a Content Package will be created at your working directory folder “source-package”. This package consists of .dat files (pointing to your actual files) and few XML files (which holds files metadata and other information related to Source)
Now let’s see how to generate a target Manifest Package based on this Content Package and target Site details.
Step 3: Generate the Manifest Package
The Manifest package is a package of XML files that define metadata, versioning information, permission information, user and groups, lookup relationships if any for your items and the settings for your import.
Refer to Content migration schemas for more details about these manifest files.
To simply generate the manifest package targeting your destination environment, run the following commands substituting your values:

You can find this cmdlet detail here ConvertTo-SPOMigrationTargetedPackage
Once the command executed successfully, you can see your Manifest Package at your provided target-package working directory location.
Step 4: Submit packages to Azure Storage Account
Now let’s submit the generated Content Package and Manifest Package to Azure Storage Account.
These packages will be created as containers in Azure Storage Account. So, provide the names you wish for them using below cmdlets.
Also, you must provide the Azure Storage Account name and Account key to push your content to Azure. You can get them from here.

You can find this cmdlet detail here Set-SPOMigrationPackageAzureSource
Once the command executed successfully, you can see Content Package, manifest, and queue containers with your packages in your Storage Account.
Step 5: Start your migration job
Now let’s submit and start a migration job referenced to a previously uploaded package in Azure Storage Account.

You can find this cmdlet detail here Submit-SPOMigrationJob
Step 6: Monitor your migration job
At this step, Azure will take care of migrating your content to the destination. This process is a timer-job based, which means we have to wait for Azure bots to pick our package and start the migration to the destination.
You can view the job progress by viewing the real-time updates posted in the Azure storage account queue (the one you created in the previous steps).

Azure will also log everything that happened in the log file, which it places in the manifest container in Azure Storage Account.
If there were any errors or warnings, .err and .wrn files are also created in the manifest container.
Or you can simply use the below command to track the migration job status.

You can find this cmdlet detail here Get-SPOMigrationJobStatus
Once the migration is completed, you can delete these containers from Azure Storage Account as they are just temporary storage for your migration process.
To import your content from file shares to SharePoint Online using this API, you can click here.
Limitations
The Site, List Schema cannot be created with this API. Only content can be migrated. So, to migrate them, you must depend on any third-party tools or custom coding.
A maximum package size restriction applies. So, if you want to migrate a large number of files with huge sizes, you must split them into multiple packages. As the packages increases, the complexity of the process increases. You have to take care of the number of migration jobs and azure containers created, awaiting algorithm to track the completion of each migration job, a proper retry algorithm in case of any job fails and the proper process for deleting the containers after the completion of each successful job.
Handling unresolved users (if users do not exist in the destination environment), lookup relations and few other things also should be taken into consideration when using this API.
Saketa Turbo Migration
The API addressed two major concerns of SharePoint Online migrations which are performance and throttling issues. Yet the API has many limitations as discussed earlier.
To overcome these limitations and yet not compromising the performance, Saketa built a powerful SharePoint migration tool that leverages this Office 365 migration API for content migration and can also create an entire Site or list schema.
Saketa SharePoint migrator tool also provides advanced mappings and configurations which address many migration concerns like orphan users, missing site templates, limiting versions and incremental migrations.
Few salient features of Saketa SharePoint Migrator:
- Migrate from a vast set of data sources like file systems, network shares, Cloud storages (Box, Dropbox, Google Drive, One drive) and any version of SharePoint (2007, 2010, 2013, 2016, 2019 and O365 Online) to any version of SharePoint.
- Import data from an Excel file to a SharePoint list with the ability to map the fields and order.
- Filter data on any field and migrate the filtered content using CAML query designer.
- Schedule your migrations to run in less busy hours.
- Automation capabilities with advanced PowerShell cmdlets
- Inventory, pre-migration and post-migration analysis and reporting.
- Manage you entire SharePoint security from a single place.
To install and to get more details of advanced features of Saketa Migrator, check the Saketa Migrator site.
Saketa SharePoint Migration Tool
Experience a high-speed, hassle-free migration with no data limits.


Whenever a new version of SharePoint is released upgrading from a previous version is not as simple as running a quick background software update.
There are lots of advantages for SharePoint online compared to Sharepoint on premises, but the best reason is probably the fact that this will be the last SharePoint migration that you will need to do since Microsoft will take care of the updates in the future.
Once the users are migrated you will still have to purchase office 365 licensing for them and assign to the users.

But when it comes to SharePoint online migrations, performance and throttling issues are always primary concerns no matter which tool we use.
Saketa Migrator allows you to migrate either with the usual speed or go for turbo speed if the client has an azure storage account.
The user needs to be a Site Collection Administrator of every personal site that is to be migrated.
So, it is quite complex and not at all a feasible solution to migrate manually when thousands of users and files are concerned.
If you are looking for migrating not just files but a whole lot more, choose Saketa SharePoint Migrator as it migrates the entire Site Collection.
SharePoint’s popularity and vast usability are undeniable but with the whole corporate world being reduced to a single virtually connected Digital workplace, new embellishing tools such as Microsoft Teams, planners, etc have emerged as new workplace essentials.

If you are still using traditional Microsoft Office package, then you need step forward to track your Office 365 Migration.
So, grab it and be a success.What is Office 365?It is the subscription-based virtual office which offers more advanced features like Skype, OneDrive, Yammer, etc., for that it doesn't depend on Microsoft Office software package.Why Use Office 365# Office Friendly and Interactive ApplicationsOffice 365 is not just a Microsoft Office Word, Excel, PowerPoint, Microsoft Office OneNote, or other traditional features.
But it offers more essential, advanced and easy to use applications like OneDrive, Yammer, Skype, etc.# Free Updated VersionNo need to go to the market and buy any costly software.
In this way, you can save your money.# Mobility MattersNo matter where you are at home, outdoor, or at any other place, Office 365 allows you to always stay connected to the office.
You can work from anywhere, anytime.# No Platform RestrictionThe "windows system" is now open for all the platforms whether it is Apple, or Android.
You can own up to 15 licenses for tablet, mobile, and PC/Mac.# Highly SecureOffice 365 implementation enables you to use award-winning security applications to protect your confidential data from hackers.# Best Storage SolutionYou can save large amount of data without any hassle as compared to any other a generous file hosting service.# Boost Your ProductivityBusiness success and its security are all about productivity.