QuickBooks is the best accounting software when we gander at its features and amenities to make the businesses workflow easy. If you are a new user, tell you that you can also print checks in QuickBooks Online. Continue reading the process to know how to print a check in QuickBooks Online that you have already recorded.
Direction for how to print a check in QuickBooks Online:
There are three steps for the process of how to print a check in QuickBooks Online, follow up:
Step 1: Set up QuickBooks Online to print checks
- Before starting with the primary process of how to print a check in QuickBooks Online, make sure you check out the paper size. It has to be suitable according to your printer and check the size.
- You can make a custom paper size which should be 3.6 inches wide and 7.9 inches long. Save it as your default print size for the check.
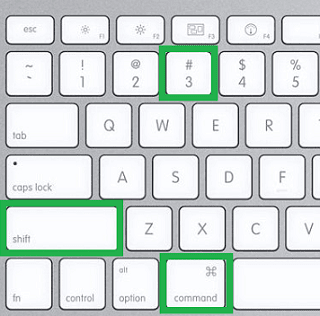
- Turn on the landscape mode to print the check.
Step 2: Add your check to the print queue
- If you want to record a new check, you can select the Print Later checkbox; else, go with the Print check option, which will add it to the queue. You can print all your checks simultaneously.
Step 3: Print your check from the print queue
- Select New and then select Print check.
- Now, you have to load the checks into the printer.
- From the drop-down list, choose the recent account from where you created the check.
- Enter the check number of the very first check that you want to print from the Starting Check Number Field.
- Choose the Checkbox next to every check you want to print.
- Click on Preview and Print; if everything seems good, click on Print.
- Click on Done if the check has been printed perfectly.
Here is how to print a check in QuickBooks Online; make sure you try to print an ordinary paper before printing the check to avoid wasting any check.
Bottom words:
Hopefully, you have learnt how to print a check in QuickBooks Online. If you have some more queries related to QuickBooks, do consider reaching out to Accounting Error Solutions.


Voiding a check erases the amount of the check from the QuickBooks register.
Another alternative that you have available to you is to erase your check; however this may not always be a choice that is considered.
In this blog, you will go through How to Void a Check in QuickBooks.

Voiding a check in the current period causes few issues.
If this check is a payroll check, and all payroll tax returns have been filed, voiding this check can have a huge effect on your books.
If tied to bank reconciliation, you will need to undo and redo bank reconciliations to make a full correction.
The steps discussed in this post can help you to understand how to avoid or reverse a voided check in QuickBooks.
If you are facing any technical unease, and need professional assistance.

How to void a check in QuickBooks OnlineGo to Expenses.On the Expenses tab, select Filter.In the Type field, select Check.Select the date range in which the check was received and select Apply.Select the check to void from the Expense Transactions list to open it in the Check screen.Select More, and select Void from the pop-up menu.