If you are about to start using some third-party antivirus software, you may want to disable the built-in system protection and install that latest antivirus hit. While doing it, this is when some difficulties may appear. In this article, we’ll tell you how to disable Windows Defender in the new operating system by Microsoft.
The Microsoft Defender antivirus (previously known as Windows Defender) is a free tool integrated into Windows 11 to protect your computer from viruses and other malware. In addition to combating viruses and similar programs, Microsoft Defender also offers you to secure your account, improve your safety online, monitor your computer’s performance and health, use parental control options, add a firewall for extra protection, and ensure network safety.
If you are using a third-party antivirus software, you may want to disable the built-in system protection and install that latest antivirus hit. When you try to install a third-party antivirus, some difficulties may appear.
Method one. Disable it with group policy settings
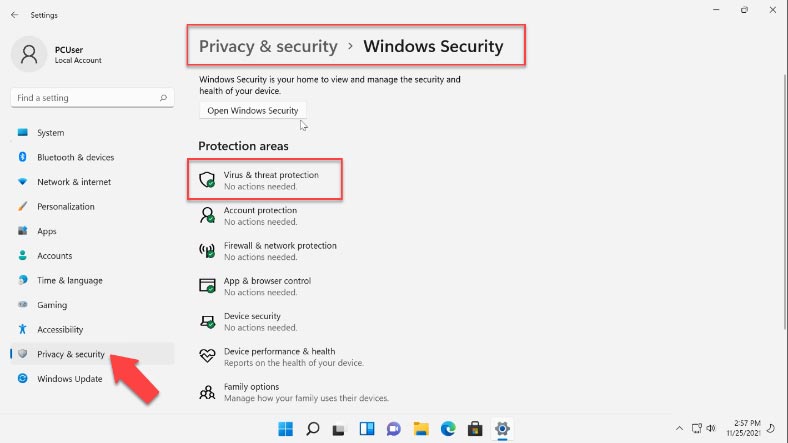
For starters, disable the system protection and then run the Group Policy Editor. Click on Start – Settings – Privacy and security – Windows Security.
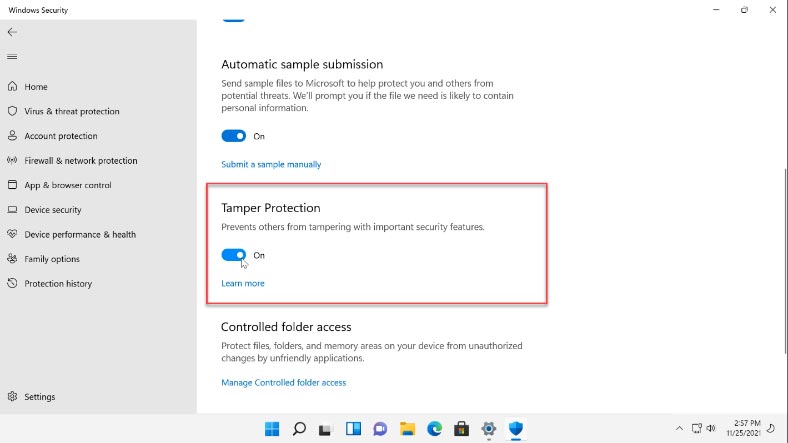
Then go to “Virus threat protection” – “Manage settings”, and disable “Tamper Protection” here.
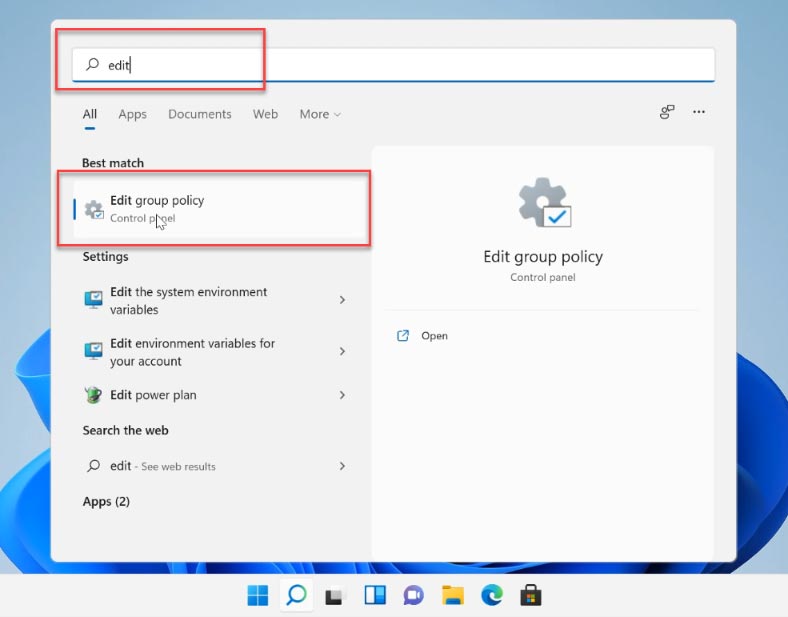
To run the group Policy Editor, find “Edit group policy” with the search feature and click on it.
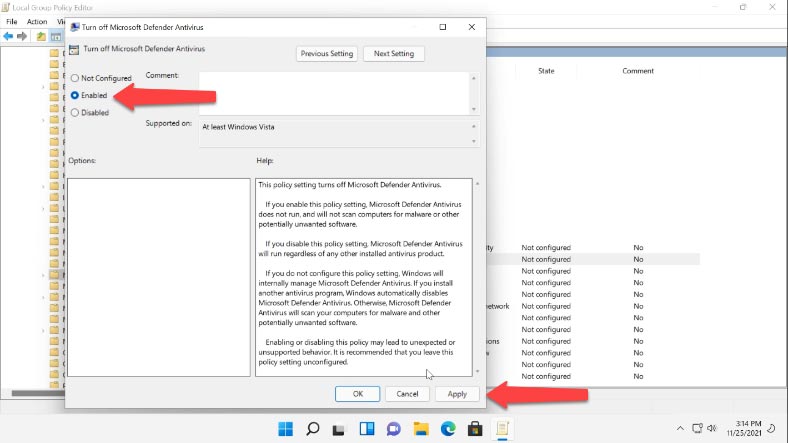
In the program’s window, go to Computer Configuration – Administrative Templates – Windows Components – Microsoft Defender Antivirus. Look to the right to find the setting “Turn off Microsoft Defender Antivirus”.

Right-click on it and select “Edit”. In the window that opens, check the option “Enabled”, then click “Apply” and OK.
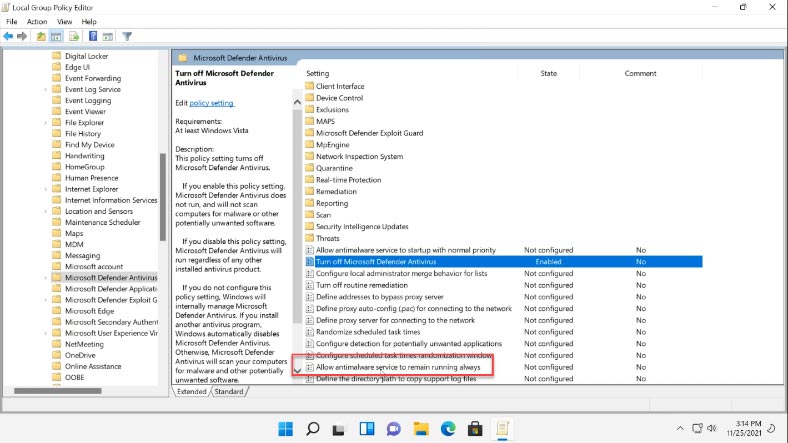
After that, modify the setting “Allow antimalware service to remain running always”, check the option “Disabled”, click “Apply” and OK.
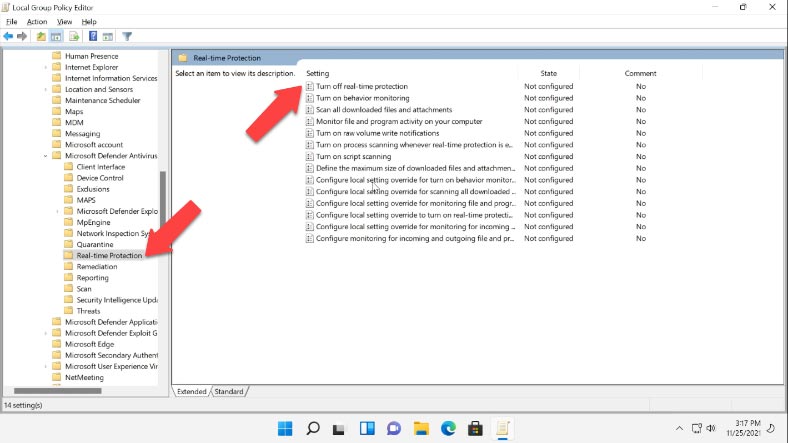
After that, open the folder “Real-time Protection” and open the setting “Turn off real-time protection”. Check the option “Enabled” – click “Apply” – OK.
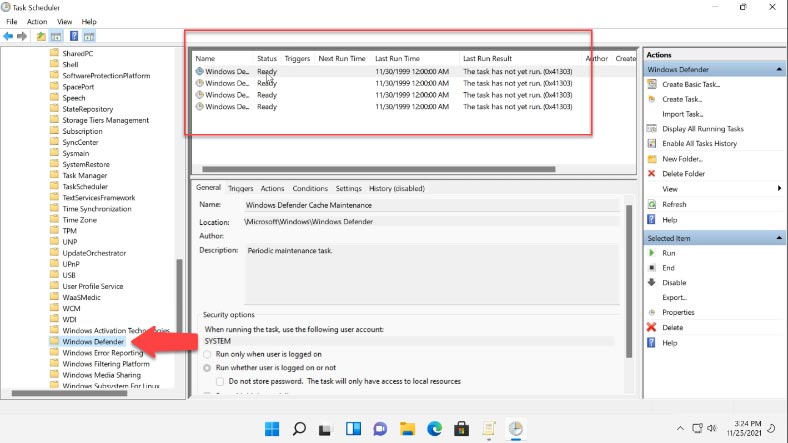
Now that the group policy is configured, you need to set up Task Scheduler to prevent certain services from running, and to avoid errors after the Windows 11 antivirus has been disabled. Use the search feature to find “Task Scheduler” and open it.
Jump to Task Scheduler Library – Microsoft – Windows – Windows Defender. One after another, disable these four tasks:
- Windows Defender Cache Maintenance
- Windows Defender Cleanup
- Windows Defender Scheduled Scan
- Windows Defender Verification
Right-click on each one and select “Disable”.
After you do it, the Defender will no longer start together with Windows.
Method two. Disable it by modifying the registry
Another way to disable protection is by modifying the registry.
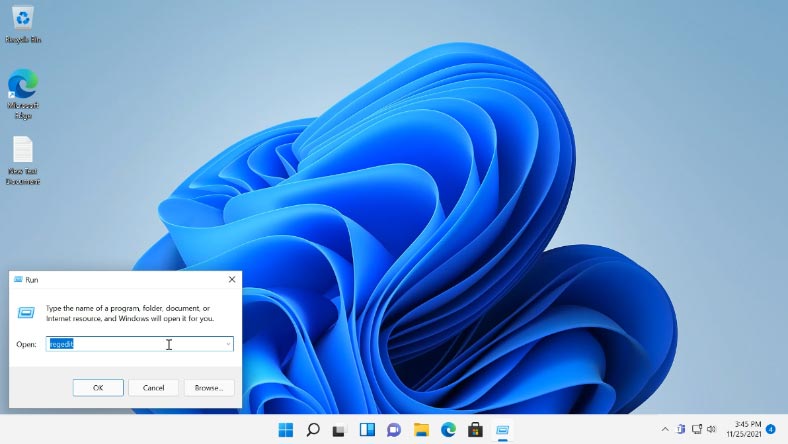
Right-click on the Start menu and select Run, and then type “regedit” in the corresponding field and click OK.
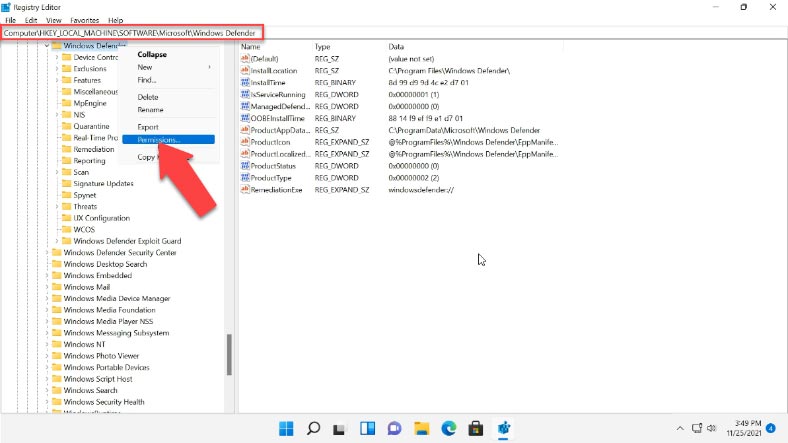
In the Registry Editor window that appears, follow this path:
HKEY_LOCAL_MACHINE\SOFTWARE\Microsoft\Windows Defender
To edit or add a value to this folder, you need to change its owner first. By default, the owner is “System”. To change it, right-click on the folder and choose “Permissions”.
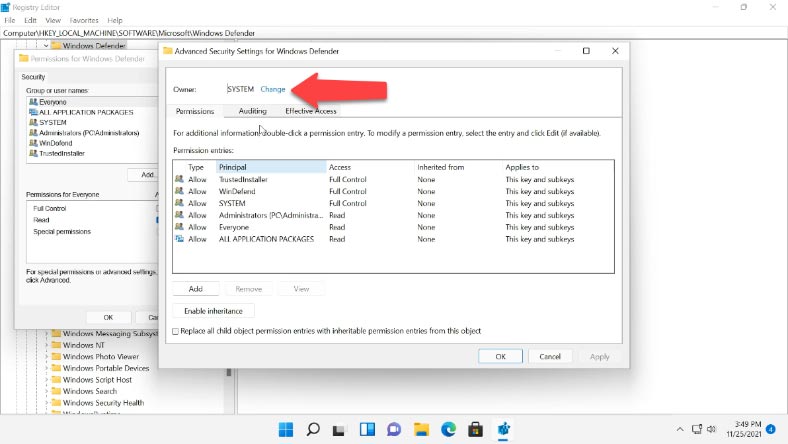
In the window that opens - “Permissions for Windows Defender” - open the tab “Advanced” and click “Change” in the “Owner” field.
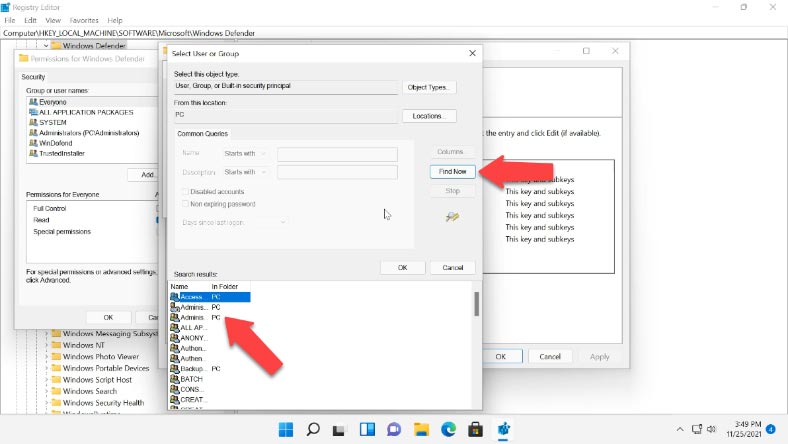
Another window opens. Click “Advanced” - “Find Now” - select the Administrator account or the Administrators group, then click OK, and OK one more time to confirm the changes.
Now check the boxes next to “Replace owner on subcontainers and objects” and “Replace all child object permission entries with inheritable permission entries from this object”, and click “Yes” in the Windows Security warning message that appears.
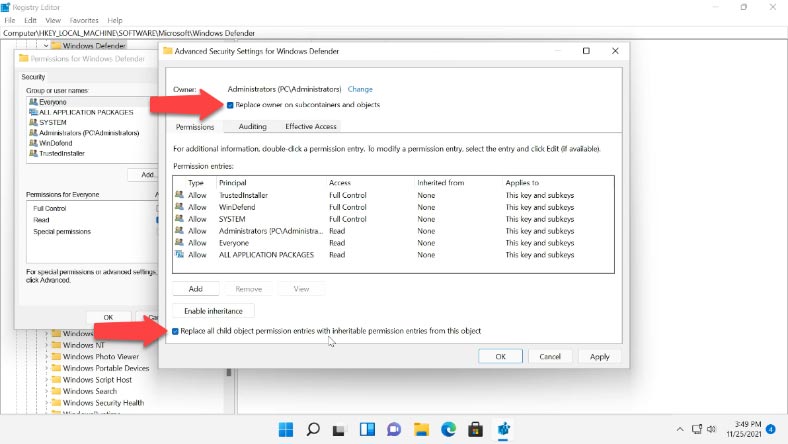
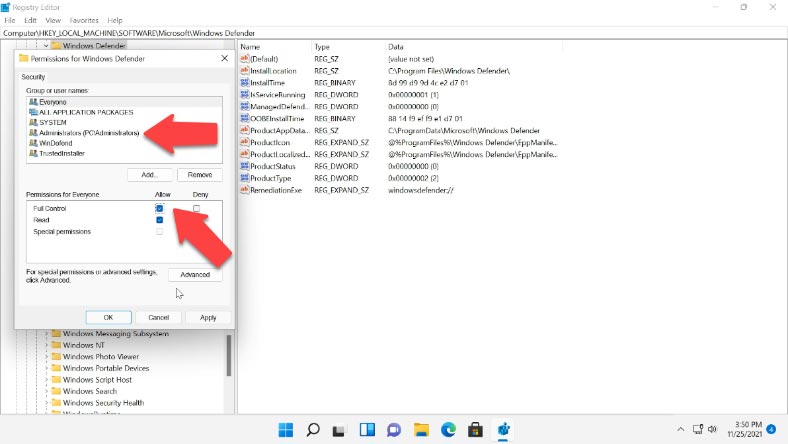
Going back to the group permissions window, grant the users with full control and click “Apply” and OK to confirm it.
Now you can start editing the registry. In Windows Defender branch, create DWORD values (32 bit) with the following names: DisableAntiVirus, DisableAntiSpyware, ServiceStartStates, and change their values into one.
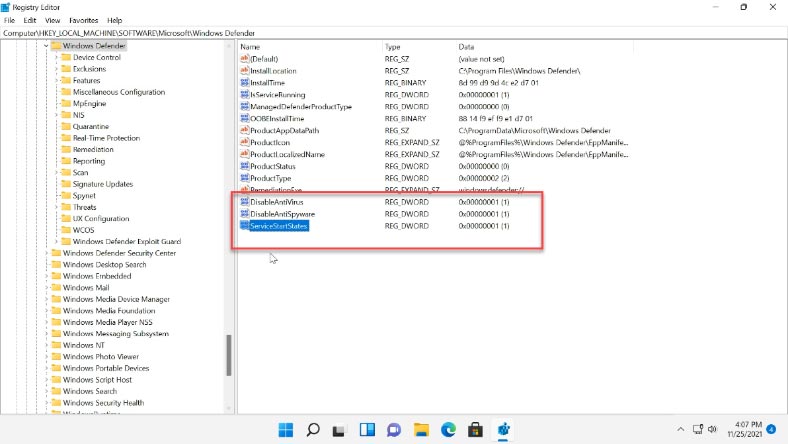
After that, close the registry editor and restart the computer. After the restart, the Defender will be disabled. If you ever need to start it again, go to “Virus and threat protection” and click “Turn on”.
Read the full article with all additional video tutorials. Also visit our Youtube channel, there are over 400 video tutorials.


Upgrade to Microsoft Windows 11 – Microsoft Product KeyNow that Windows 11 is past the beta phase, you can upgrade to the official launch construct of the os without joining the Windows Professional program.
Nevertheless, what if you're still waiting on Windows Update to boost you, a treatment that could take months?
Intend you want to throw Windows 11 onto an old or speculative computer system without requiring to set up a turned-on duplicate of Windows 10 initial?
Or suppose you desire a clean slate without every one of your old programs and setups being rollover?
Thankfully, there are a number of means to get one.
Second, you can utilize tools from a UUP dumpsite to download the information from Microsoft's upgrade internet servers, along with create a personalized ISO that's utterly current with an expert develop that's also more recent than the launch construct.

VideoProc Team from Digiarty Software launches the essential software giveaway in time for the Window 11 update.
Participants can grab apps for free to enhance productivity and creativity on Windows 11.Windows 11 is a major update of Microsoft's operating system ever since the release of Windows 10 in 2015.
With a revamped UI, AI-powered widgets, Auto HDR for gaming, and improved performance, Windows 11 is bringing in new experiences for users.Echoing with Windows 11's vision to enhance productivity and creativity, VideoProc has the following goodies ready in the campaign.Free for everyone in the event:VideoProc Vlogger to inspire your creativity:This free video editing software just makes its debut last month (version 1.0), with creative editing features that rival many paid software on the market.VideoProc Converter to empower your productivity;Ashampoo Backup Pro 14 to backup files and hard drive.The story continues here at Business Wire.

Microsoft has uncovered Windows 11, which includes a major update alongside bunches of new highlights.
Microsoft says it will be accessible as a free overhaul on the off chance that you have a Windows 10 PC, and new PCs with Windows 11 pre-introduced will appear on schedule for these special seasons, as well You can check if your PC is qualified for the free Windows 11 redesign by going to Windows.com and downloading the PC Health Check application.
Microsoft plans to carry out an early form of the product update to its Windows Insider Program one week from now.
There's a new Start button that is set at the middle, and squeezing it can show you your new records, docs and applications.The Start menu currently moves from the huge rundown of uses, and rather has a framework of select applications, and a second lattice of suggested archives.
An "All Apps" button probably prompts the customary rundown of applications.The general objective is to get to where you need to speed up.
There's likewise new tones and advances, and a new dull mode that makes content stick out.Get daily tech updates from the best digital marketing company in Jaipur.Windows 11 Snap Layouts, Snap Groups and docking Figure 2 (Picture credit: Microsoft)Windows 11 currently includes Snap Layouts.