Office applications, browsers, user folders and various activities of the operating system itself are gradually eating up the free space of the system disk. In this article, we’ll tell you how to extend disk С, if the button “Extend Volume” is inactive, and how to increase its size without losing data.
Why the “Extend Volume” button is inactive
Many users face this problem: “Extend Volume” button appears to be inactive when they try to increase the size of a partition.

The most common reason for this is that the unallocated space is situated on another physical disk, and this is when disk extension operations are not possible. The unallocated disk space and the disk you want to extend should be located on the same physical disk so that they may interact with each other.
What is more, the unallocated disk space should be located to the right of the partition that you would like to extend.
How to extend disk С
The first method of extending Disk C is without using third-party software tools, that is, with integrated Windows features only. The built-in disk management tool has rather limited functionality in comparison with other utilities, but it will suffice if all you need is to change the volume size.
The biggest disadvantage of this method is that you’ll have to remove all the information from disk D. The only way you can increase the size of a partition with Windows tools is by making use of unallocated disk space.
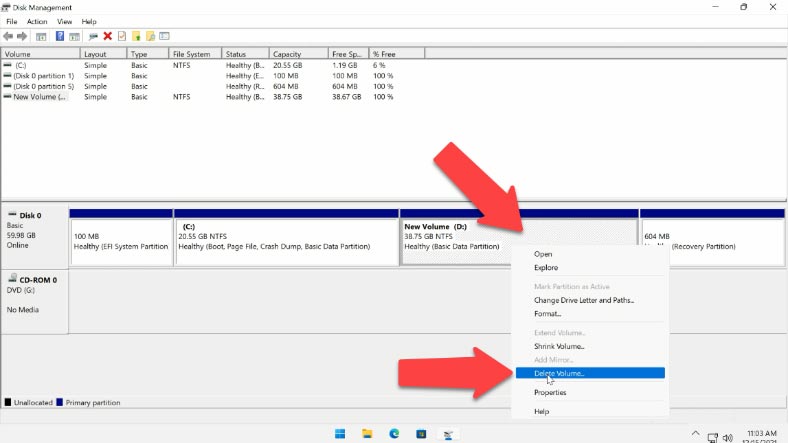
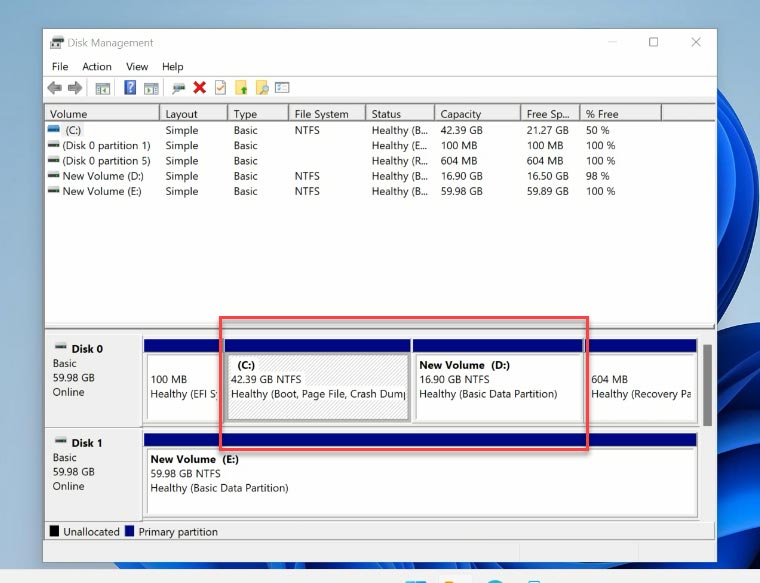
Right-click on the Start menu and choose “Disk Management” from the list. The partition is actually divided into two disks: C and D. If you want to extend disk C, you’ll have to delete disk D completely.

Yes, I mean delete, not shrink. If you choose shrinking, the free space that appears will be located to the right of the shrunk partition, and so it will not be adjacent to partition C. This little but important fact prevents us from extending volume C at the expense of volume D by way of shrinking. Right-click on it and choose “Delete Volume” from the menu. Then click “OK”.
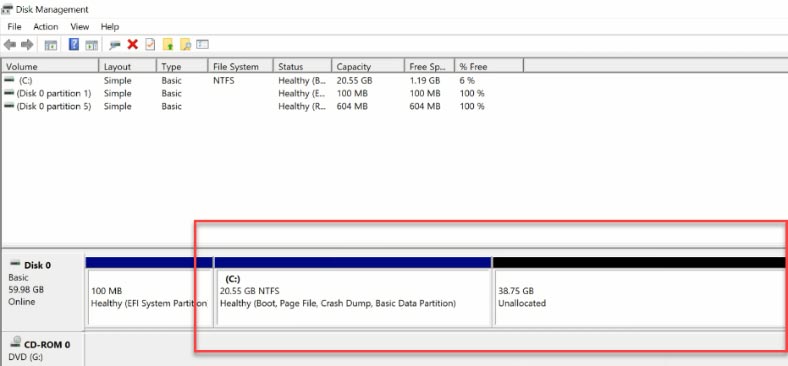
When the partition is deleted, you can see that the unallocated space appeared to the right of the partition which you would like to extend, and it is situated on the same physical disk.
How to remove a partition with the command prompt
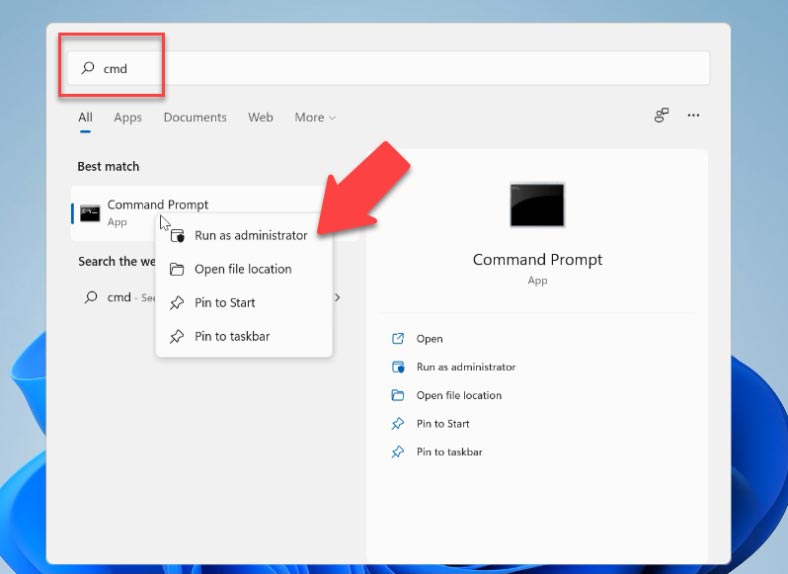
You can also remove partitions with the help of the command prompt, using the DISKPART utility. The most important thing is to be careful and make sure that you don’t confuse partition numbers – otherwise, important data can be lost! Start the command prompt as Administrator.
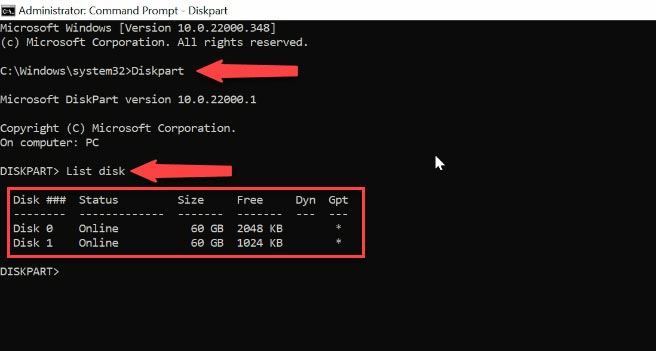
In the command prompt window that opens, type the command “Diskpart” and press Enter. After that, type the command “List Disk”. Now you can see the list of all disks available on this computer. It is important to remember that the numbers start from zero, instead of one. So your first disk is marked as disk 0.
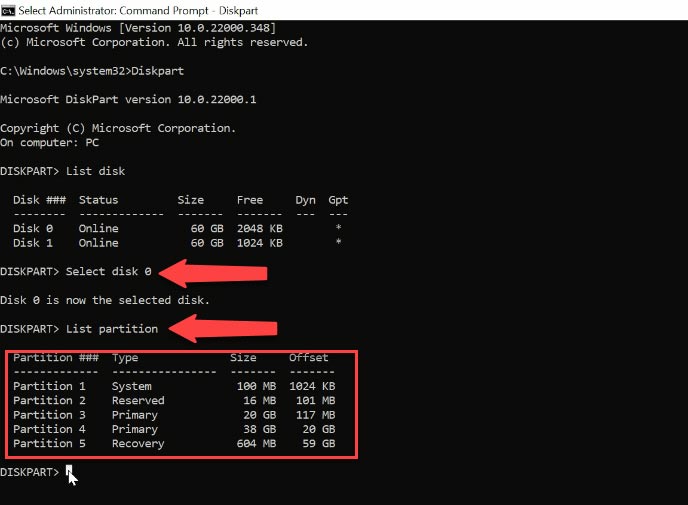
Now type the command “Select disk” and add the number of the disk you want to remove. Be careful and select the proper disk number. Follow it by typing “List partition” command. Now you see all the partitions available on this computer. To understand which partition you need, open Disk Management. You can check the disk by looking at its volume – we need to find disk D.
Go back to Diskpart; the partition we need has the number 5, and the size coincides. Run the command “Select partition” and choose 5. After you selected the partition, type the following command: “Delete partition”.
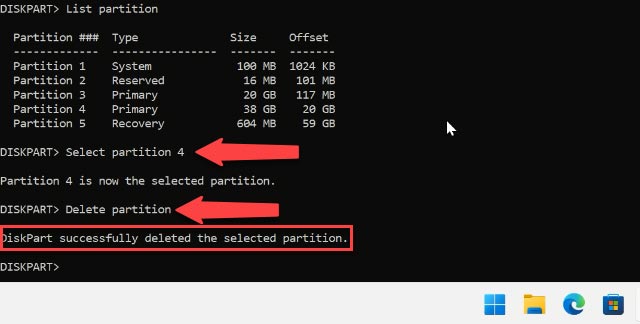
Now that partition is gone. Go to Disk Management to find some unallocated space there.
Extend Volume Wizard
Then right-click on disk C and choose “Extend Volume”. It opens the “Extend Volume Wizard”. Click “Next”.
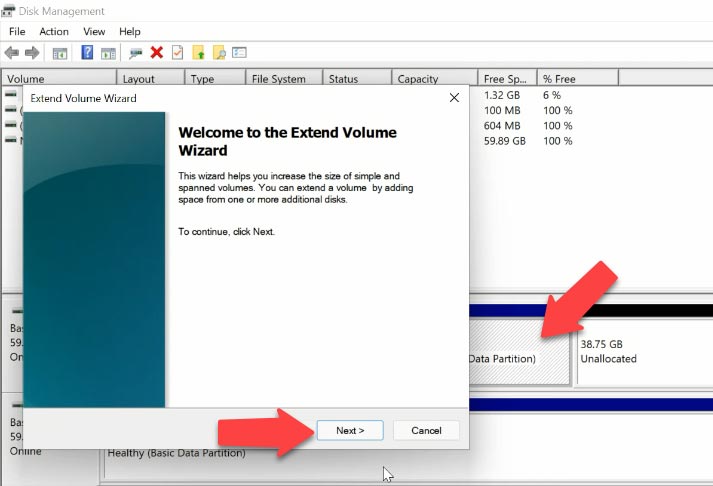
Let’s add some of the unallocated disk space – for example, about 7 GB. Click “Next” and “Finish”.
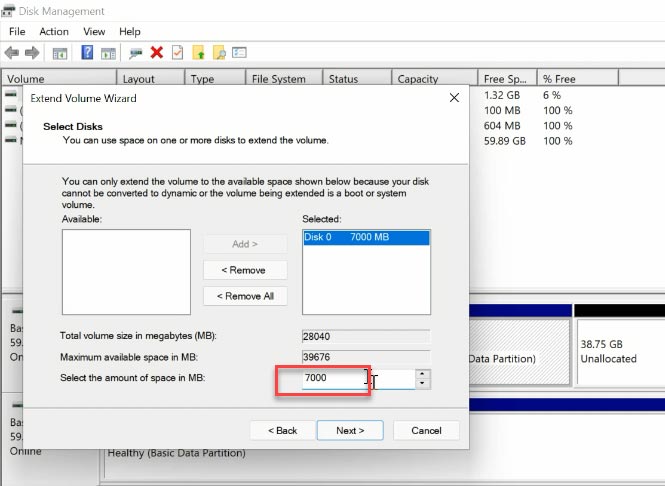
When it’s over, disk С will be extended.
How to create a new disk in an unallocated disk space
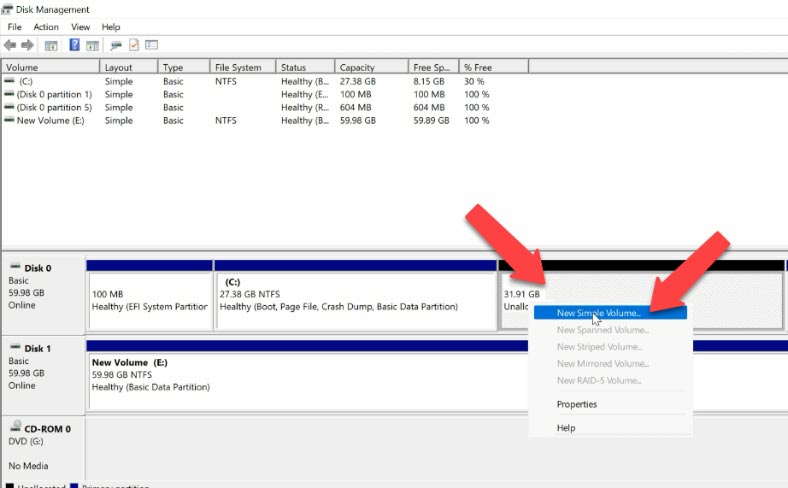
To create disk D again, right-click on the remaining unallocated space and select “New Simple Volume”.
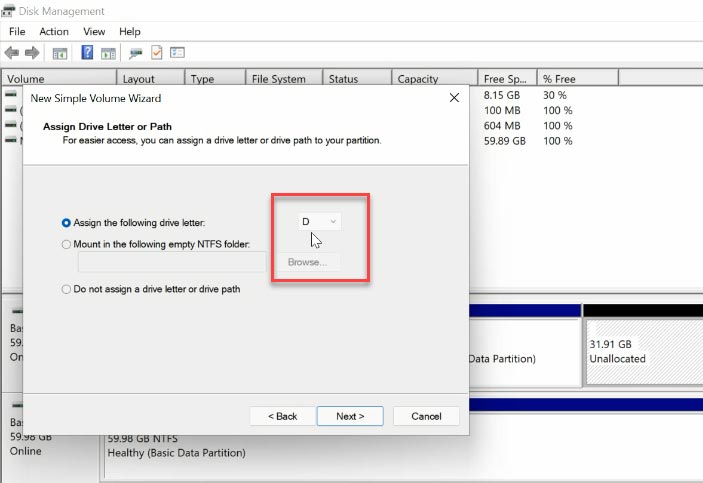
Assign the drive letter – D. Format it in NTFS and click “Finish”.
As a result, disk C has increased, and disk D has become smaller.
How to extend Disk C, but with Disk D data preserved
Here’s the second method. It is good for situations when you have important data on disk D but you need to use some of its free space to extend disk C. Unfortunately, integrated Windows tools cannot help you, so you will need some additional software. For illustration, I’ll be using AOMEI Partition Assistant Standard. Go to the program’s official website and download it. As you might guess, I have already done it in advance. There shouldn’t be any problems for you to download it as well.

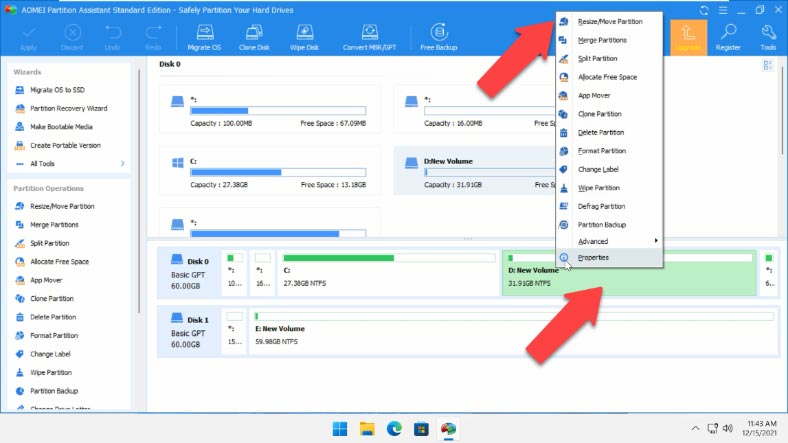
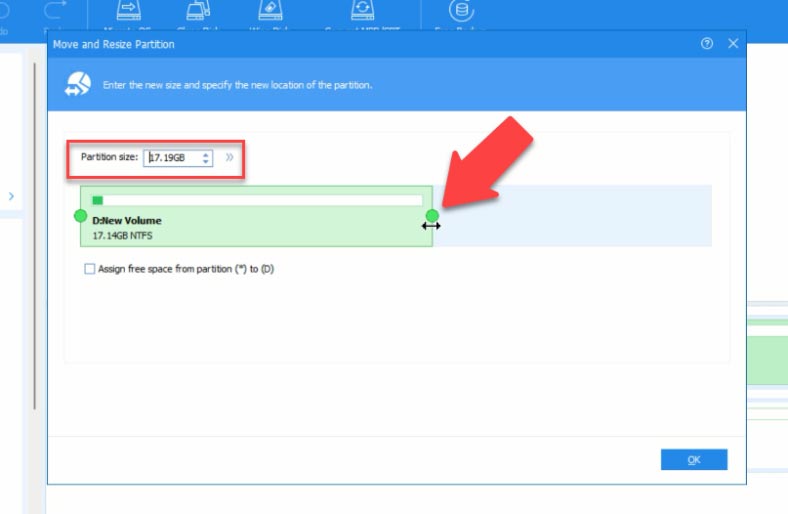
When you start the program, you can also see two partitions, but unlike Disk Management in Windows, this software lets us increase the size of disk C at the expense of disk D without losing data stored on disk D. To do that, right-click on disk D and choose this option to resize partition.
Specify the required number of gigabytes that you would like to add to disk C later, and click OK. Now, some unallocated space appears.
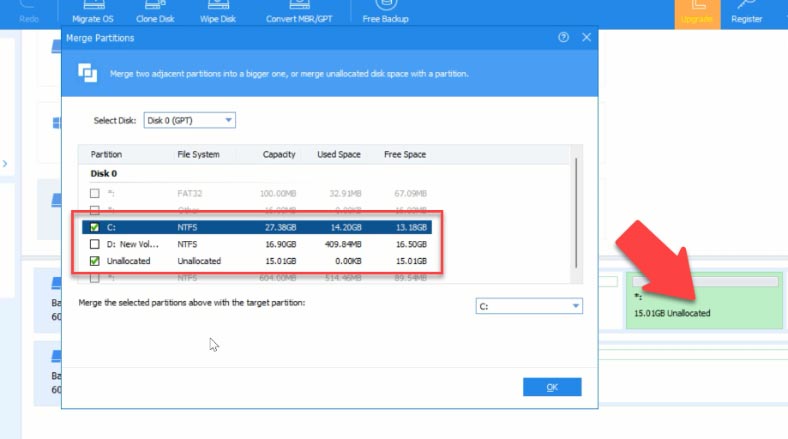
Right-click on it and select “Merge Partitions”. In the window that opens, select the disk partition to merge to. In our case, that is Disk C. Click “ОK” and “Apply”. In the window that opens, click “Go” and then OK.
This process takes some time, and then the computer will restart. When you check it, you’ll see that disk C has become bigger, while disk D is now smaller, and you haven’t lost any data there.
But even if some information was removed accidentally while you were extending a volume, resizing partitions, creating new partitions or formatting them, you can still have it back with the help of Hetman Partition Recovery.


Upgrade to Microsoft Windows 11 – Microsoft Product KeyNow that Windows 11 is past the beta phase, you can upgrade to the official launch construct of the os without joining the Windows Professional program.
Nevertheless, what if you're still waiting on Windows Update to boost you, a treatment that could take months?
Intend you want to throw Windows 11 onto an old or speculative computer system without requiring to set up a turned-on duplicate of Windows 10 initial?
Or suppose you desire a clean slate without every one of your old programs and setups being rollover?
Thankfully, there are a number of means to get one.
Second, you can utilize tools from a UUP dumpsite to download the information from Microsoft's upgrade internet servers, along with create a personalized ISO that's utterly current with an expert develop that's also more recent than the launch construct.