


![How To Connect a Canon Printer To a MacBook? [An Easy Guide]](https://d1tlrxy0mfxnyo.cloudfront.net/thumbnail/504372/63ae08f9-839d-3c69-1ce1-15178b896f76.jpg?width=649)
If you’ve recently bought a new Canon printer and don’t know how to connect it. If you are searching for a detailed guide on how to connect a Canon printer to MacBook, then in this article, we explain step-by-step instructions to connect your Canon printer to MacBook. Visit at- ij.start.canon setup
Canon brand is famous for manufacturing electronic equipment, including cameras, computers, printers, scanners, and many more. It has been a favorite manufacturer for most people over the years because of its high-quality products.
Canon printers work with almost all types of operating systems, like Windows, Mac, iOS, and Android. Printing with a Canon printer is always easy and convenient. The below instructions will guide you completely to connect with your MacBook. So let’s read!
How To Connect a Canon Printer To a MacBook Using Wi-Fi?
To set up a Canon printer on your MacBook using a Wi-Fi network, perform the basic instructions below:
- Confirm that the Wi-Fi network includes a WPS button.
- Also, ensure that the Wi-Fi network uses the WPA/WPA2 security protocols.
- Now, you need to turn on the Canon printer and your MacBook.
- After that, push the Wi-Fi button until the light blinks.
- Go to the Wi-Fi network and push the WPS button for two minutes.
- If the Wi-Fi lamp is blinking, the printer searches for available networks.
- When the printer searches for Wi-Fi, the Power, and Wi-Fi lights flash.
- Once the printer is connected to Wi-Fi, the Power and Wi-Fi lamps stop flashing and become steady.
- Download a compatible printer driver from “Ij.start.canon“
- Finally, the Canon printer is ready to use after completing the software setup.
How To Connect a Canon Printer To a MacBook Via a USB Cable?
Follow the easy directions in order to set up a Canon printer for your MacBook via a USB cable:
- First, download the driver software on your MacBook from “ij.start.canon.“
- Follow the on-screen steps to finalize the installation of the downloaded file.
- Once the installation is done, click the “System Preferences” option from the “Apple” menu.
- From the next screen, you need to select the “Printers & Scanners” section.
- The user must connect the printer by clicking the “+” icon from the “Printers and Scanners” screen.
- Select the printer from the available list and click on the “Add” button.
- Follow the last few remaining steps to finish setup, then begin working with the printer. Visit at-
How To Connect a Canon Printer To a MacBook Via an Ethernet Cable?
You can connect a Canon printer to your MacBook via an Ethernet cable. First, a printer must be connected to a network with an Ethernet cable. After that, printer drivers need to be installed on your device. Complete the procedures below in order to connect a Canon printer to your MacBook via an Ethernet cable (wired LAN connection.)
Connect your Canon printer to communicate via an Ethernet cable:
Before you begin, connect the Canon printer to communicate via an Ethernet cable. After that, finalize the setup on your operating system.
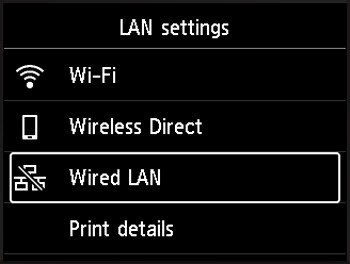
- With the Canon printer on and the Home screen displayed, select the “LAN Settings” option and hit the “OK“ button.

- After that, a Wi-Fi network will be selected in the next step.
- Select the “Wired LAN” option from the next screen and click the “OK” button.

- You need to hit the “OK” button on the Wired LAN setting list screen.

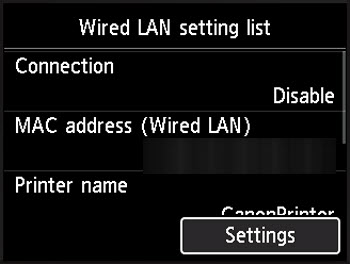
- “Enable/Disable Wired LAN” will be selected, and then tap the “OK” button.
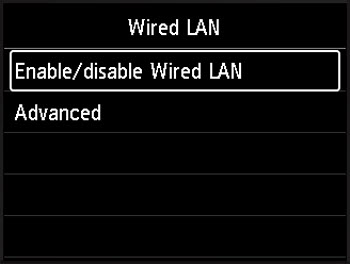

- Now, select the “Enable“ option, and click the “OK” button.


- The Ethernet port on the Canon printer will become active.
Download and install the setup file on your MacBook:
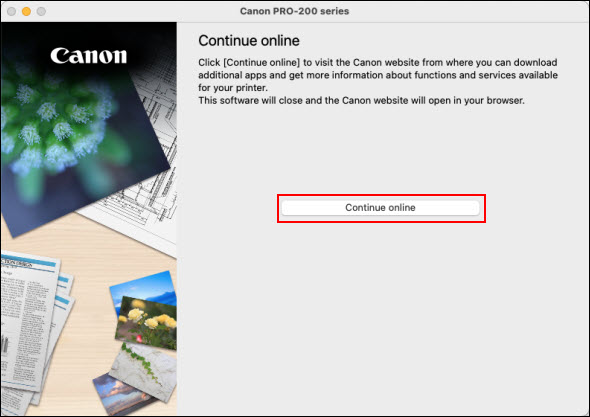
- Tap the Setup icon in the Dock, and follow the on-screen prompts to continue with the setup.
- Then, select the “Continue Online“ button. And the installer will close.
- After that, you need to press the “Next“ button.
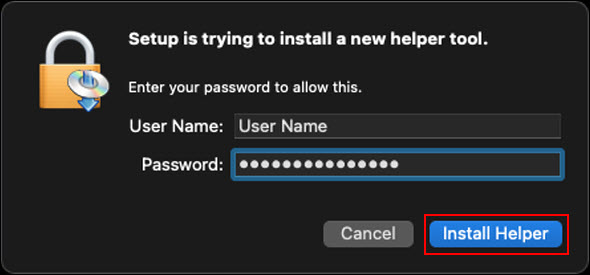
- Input your device’s password and hit the Install Helper button.

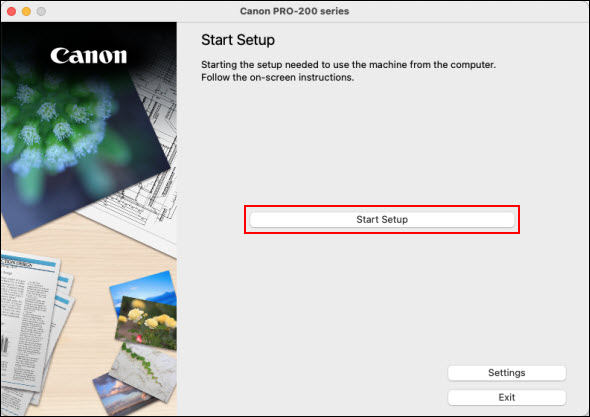
- Select the “Start Setup” button from the next screen, and tap the “Next“ button.

- The installer will retrieve data about the latest printer driver. It takes a few minutes.
- Tap the “Yes” button on the License Agreement. If you choose “No,” the installer will not proceed.
- You need to select “Do not agree” or “Agree.”

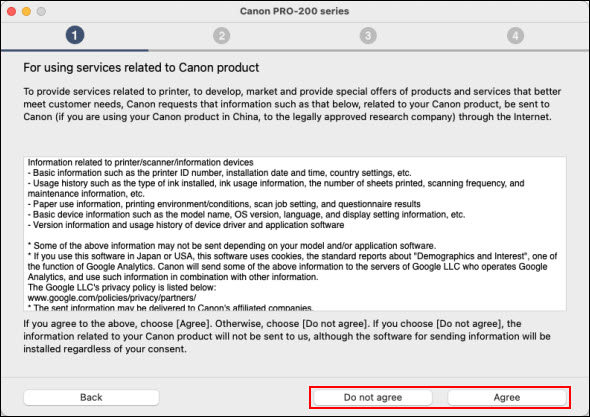
- If Agree was not selected, the following statement appears, and then tap the “OK” button.


- The installer process will start from the next screen in a few minutes.
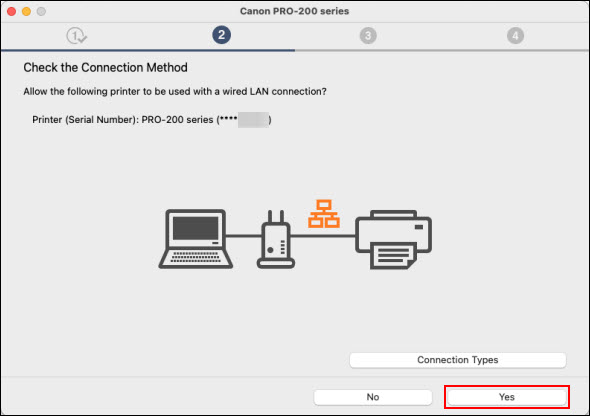
- Now, the installer will check the status of the printer.
- On the “Check the Connection Method” screen, press the “Yes” button.

- If the printer isn’t detected, disable any firewall software.
- If you’re connected to a VPN, temporarily disconnect from the VPN and then try again.
- The installer will download a compatible printer driver. It takes a few moments.
- When the following screen appears, hit the “Add Printer” button.

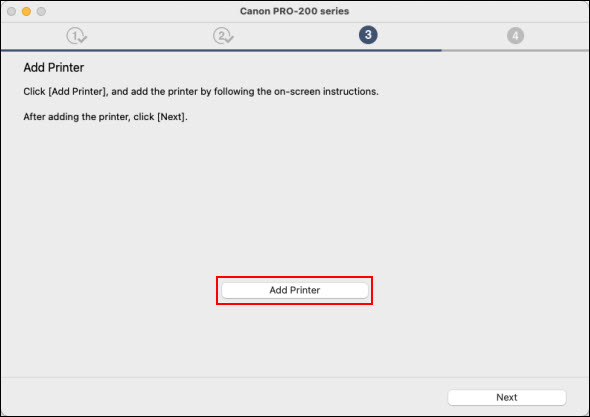
- Select the printer with “Bonjour“ listed in the right corner of the “Kind“ column.
- Select the printer model you use and select the “Add“ button.
- You need to click the “Next“ button on the next screen.
- After the installer processes for a few minutes, and then select the “Next” button.
- Lastly, select the “Continue Online” button. The installer will close.

Source Url- how to connect a canon printer to a macbook


Canon is a well-known renowned brand that is known for manufacturing the superior and innovative collection of printers in the market and if you want to know how to connect Canon IJ Setup to a wireless network using canon.com/ijsetup?
Then no look further, call us at +1 (855) 968-1096


Want to learn online how to set up the ccanon TS3322 printer via ij start canon ts3322 setup.
Then IJ Start TS3322 Setup is the best platform for you.
Our experts assist you 24/7 with support across the globe.


