


Adobe Photoshop is renowned for its impressive array of editing tools, and now users have another reason to get excited. A new tool, currently in beta testing, is set to be included in the Photoshop desktop version, and it promises to revolutionize the editing process. Known as the "Remove Tool," this feature aims to streamline image retouching by effortlessly eliminating unwanted elements from photographs.

image source: Adobe Community
Whether removing an intrusive object, an imperfection, or even a person, this tool is designed to seamlessly patch over the selected area, ensuring the final result appears flawless and natural. While Photoshop already offers various tools to address similar challenges, the Remove Tool introduces a new level of ease and efficiency. As it is being tested in beta, users can expect Adobe to make any necessary refinements before its official release, ensuring a polished and user-friendly experience.
How to use the Remove Tool in Photoshop Desktop Beta
Choose the Remove tool from the toolbox.
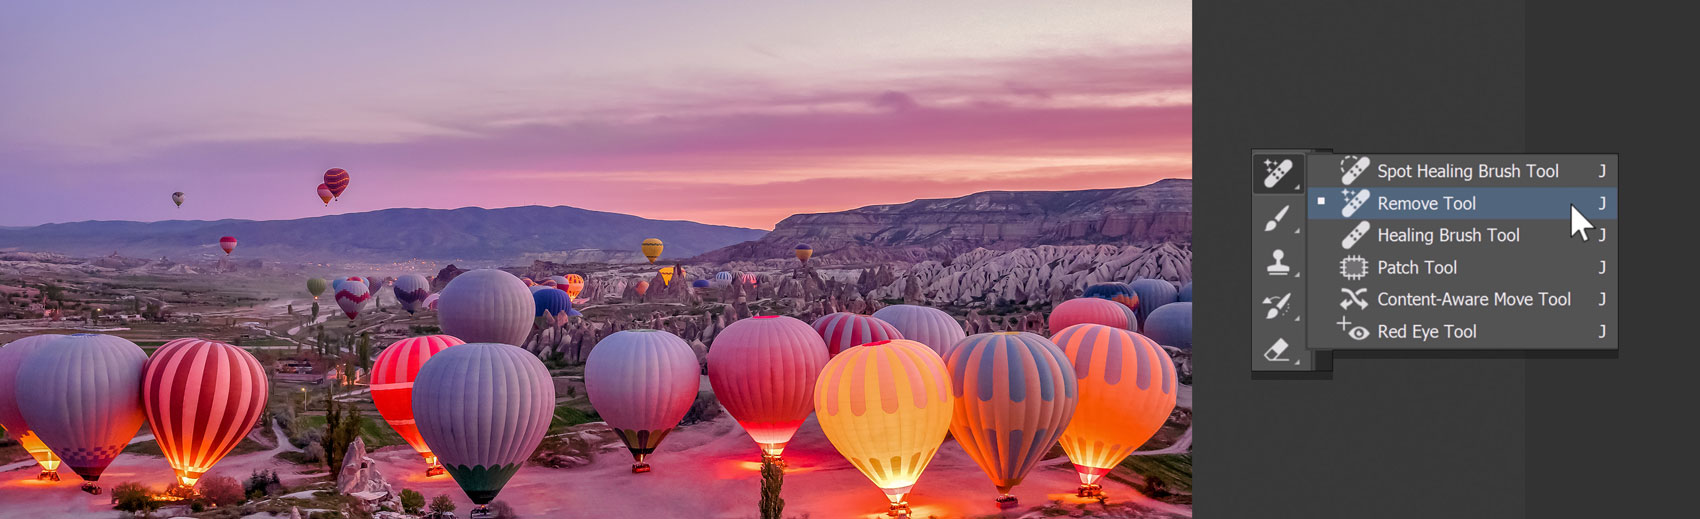
You can locate it in the group for the Healing brush tool. To expand this group, click on either the Spot Healing Brush tool, Patch tool, or Red Eye tool, this will reveal the Remove Tool.

Take note: The first time you utilize the tool after setting it up, you might encounter a dialogue box indicating "Installing required components..." Don't be alarmed; this is expected.
Choose a brush size in the options bar.
Choose a brush size that allows you to cover the whole object with a bit to spare, reducing the amount of brushing you need!
This tool does not utilize brush hardness and brush opacity settings.
(Optional)
If you must apply several brush strokes to completely cover a big or intricate object, remember to deactivate the 'Remove after each stroke' option in the options bar.
The ON setting for "Remove after each stroke" will implement the fill immediately after you finish a single stroke using the tool.
The feature "Remove after each stroke = OFF" will execute the fill function only after you hit the apply button. This allows for multiple brush strokes to be made on the object before the fill is applied.
(Optional)
You can enable the 'Sample All Layers' feature in the options bar to gather data from all visible layers.
Keep in mind: The fresh pixels will be generated on the chosen layer that is presently active.
Please generate and choose a fresh layer, and proceed to activate 'Sample All Layers' for a workflow that doesn't cause any destruction.
Select and drag across the area you wish to delete.
Ensure you encompass the whole area. You'll achieve better outcomes if you extend the coverage to include the background surrounding the object or person.
If the option "Remove after each stroke = ON" is chosen, the new pixels will only emerge once the stroke is finished. Bypass the subsequent phase. You have completed the process!
If the 'Remove after each stroke' option is set to OFF,
keep stroking the areas you wish to delete, then click the 'Apply' button in the Options bar or press 'Enter/Return' on your keyboard.
• Utilize the 'Reset all Brush Strokes' feature to erase all existing strokes and begin afresh.
------------------------------
Article Based on a question and answer from the Adobe Community.


How to Use the Photoshop Pen Tool to Edit E-commerce ImagesIn the epoch of eCommerce image & computing software, the advancement is humungous, and by the looks of it, there is no stopping of the same.
For instance, if you are aware of seeing images of different products in alternative angles with exceptional detailing and quality, Photoshop has a significant role to play.This is one of the application in e-commerce images, in one of those industries, where these can prove to be the difference from a person buying and skipping.
A pen tool is considered for its high quality and precision-based outlining, making Photoshop, an essential tool of design.
Since Pen Tool does not dictate on specific shapes, like a rectangle or circle or even oval tool, this is the most significant advantage offered.Methods to Design a New and Existing Path Using Pen ToolIf the user is dealing with any version of Photoshop, here are the basic Pen Tool variants, used in creating new paths includes,Regular Pen ToolCurvature Pen ToolFreeform Pen ToolFor existing paths, the remaining options like add anchor point tool, covert point tool, and delete anchor point tool, are instrumental.While creating a new path, it is recommended to look up to the setting of Pen Tool by looking up either shape or path in the options tab over the application bar.
Making a new path is a challenge for a newbie and there is a possibility of a blunder.
Users can drag the mouse until a point they get the desired shape of a curve.Users should take note that handles are formed with curved lines appearing previous and following the tangential point.


Adobe Photoshop Crack the essential software for perfecting your images.
It offers productivity and workflow enhancements, powerful new editing tools, and breakthrough compositing capabilities.https://www.cdrbsoftwares.com/product/Adobe-Photoshop-2021-v22.2.0.183

Sumo Paint Photo Editing Software is a full-packed online photo editor that allows you to manage basic photo editing.
It also offers a profound set of basic color correction tools that are specially designed for drawing and designing.

possums can hang from their tails.
In fact, their tails are prehensile, which means that they can curl their tails and grip objects.
The truth is that they rarely actually hang from their tails.
I've seen very few aggressive ones.
It's pretty safe to handle them this way.
I'm aware that I've misspelled the name of the animal in this blog post, but there's so many common misspellings of this animal's name that I figured I'd give it a go this time.


