When using T6 servo motor, if jitter occurs, you can eliminate it through the following methods.
When the brake is open, the mechanical installation is balanced, the coupling does not shift, the gear meshes well, the encoder wiring is correct, and there is no interference, adjust the inertia, rigidity and other parameters of T6.
1. The wiring is correct (the motor will be automatically recognized by the driver).
2. Use the “operation test” to test whether the motor is running normally.
3. Set the Pr400 value (external servo on signal Pr400=83; internal signal Pr400=3).
4. Select the control mode Pr0.01. (0: Position mode, 1: Speed mode, 2: Torque mode).
5. Connect the motor to the load and adjust the inertia ratio (Pr0.04).
Before setting other parameters (such as PID settings for position loop or speed loop), it is very important to find out the inertia ratio of each axis so as to obtain the best performance. If an axis needs to be tested, connect the motor to the load.
Ensure that the axis can move within a safe distance to avoid any interference and ensure the safety and accuracy of the test. Inertia ratio identification, preconditions:
A. Servo is disabled, B. Positive limit and negative limit are invalid.
step:
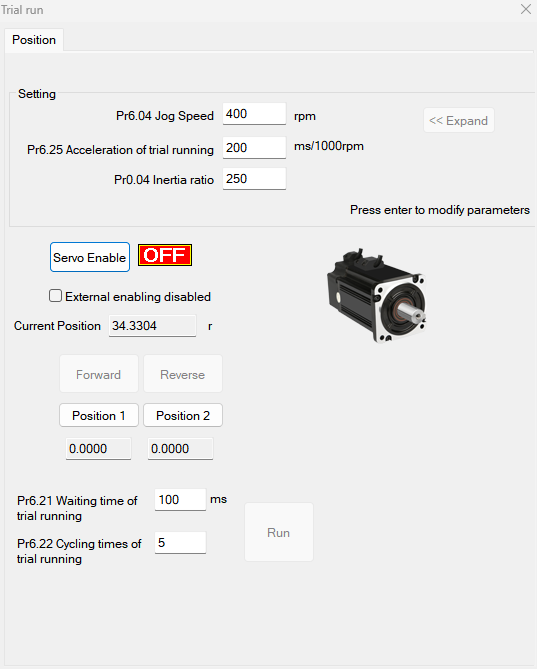
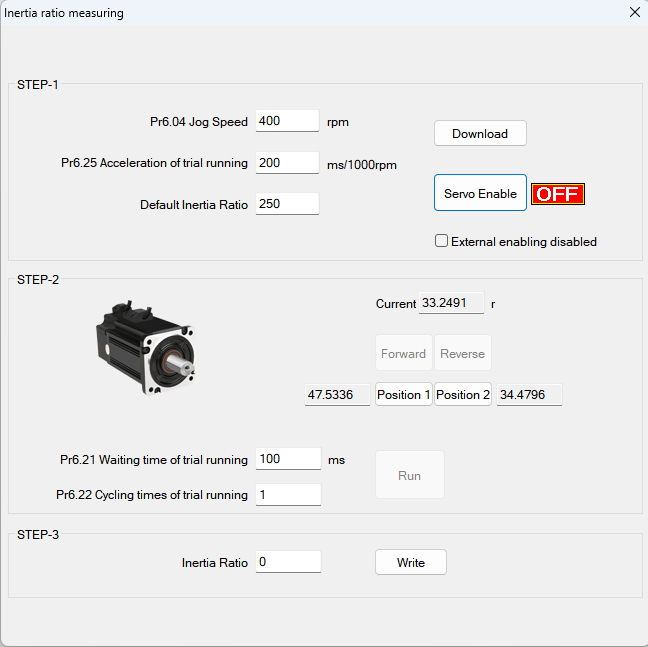
a. Set the jog speed Pr6.04. The setting should not be too large (300~1000rpm is recommended), set Pr6.25 (50~100 ms/1000rpm is recommended), and set the default inertia ratio. Download these settings and select Servo Enable.
b. Click "Forward" to make the motor run in the forward direction, and click "Position 1" to save position limit 1. Click "Invert",
Make the motor run in the reverse direction and click "Position 2" to save position limit 2. Click "Run" to start inertia ratio identification.
c. After completion, click "Write" to save the inertia ratio identification results and input them into NVM.
6. Connect the motor to the load and adjust the stiffness of each axis (Pr0.02, Pr0.03).
1).The motor is in stop state (servo enable is turned off). The inertia ratio needs to be set correctly, otherwise it will affect the debugging effect.
2). Set Pr0.02 (real-time automatic adjustment) = 0x01/0x11 or 0x02/0x12; then set Pr0.03 (machine rigidity setting)
(default) to set.
3). Turn on the servo enable, allowing the machine to operate according to normal conditions, and start estimating the load characteristics. associated control parameters
will be set automatically.
4). Improve the responsiveness of the motor by increasing the setting value of Pr0.03 (machine rigidity setting).
Please observe the positioning time and whether there is obvious vibration in the machine, and set the rigidity value to the maximum without vibration.
5).Save the result and write it into EEPROM.
7. If necessary, adjust Pr2.22 and Pr2.23 to make the movement smoother.
8. Set the value of "pr006,007,008,009,010".
9. Adjust Pr0.00 to obtain greater stiffness.
a. Select the correct control method: Pr0.01 = 0,
b. Set Pr0.02=1 for interpolation movement,
c. Set the inertia ratio: Pr0.04,
d.Set stiffness: Pr0.03,
f.Set Pr0.00:
1) If there is no multi-axis synchronous motion, set Pr0.00 to 1 or greater than 10,
2) If multi-axis synchronous motion is required, set Pr0.00 to be the same for all axes.
3) If Pr0.00 is greater than 10, set from 100 or 150, 200, 250, ....
Notice:
1. First establish the correct control method, correct specific inertia and stiffness.
2. Do not change the value of Pr0.00 when the motor is running, otherwise vibration will occur.
3. If used in manual mode, set a small value from the beginning. A smaller value means smoother operation, and a larger value means faster positioning.


Get Free Sample Copy Of This Report @ https://www.upmarketresearch.com/home/requested_sample/3178 The ServoMotor Market report published on Up Market Research is spread across 135 pages and provides an overview of the 2018-2025 of ServoMotor Market Research Report by Product Type, End-User / Application and Regions / Countries.
The Global ServoMotor Market is projected to grow at a healthy growth rate from 2018 to 2025 according to new research.
The study focuses on market trends, leading players, supply chain trends, technological innovations, key developments, and future strategies.
It also presents insights into various restraints that pose threat and highlights opportunities that will help the market pick pace in the forthcoming years.
The report compiles exhaustive information obtained via proven research methodologies and from trusted sources from within the industries.
It also includes expert opinions to provide readers a clearer perspective regarding the global market.

A Single Step Solution for all Industrial Automation Repairing Needs