Microsoft Outlook provides various features to its users, and one such interesting feature is the Follow-up reminder. It is among the most useful feature of Outlook that reminds the user to mail on a specific data that they have assigned or flagged.
It’s the remainder tool of Outlook Emailing service that helps notify and remind the users on a selected date and adds the task as a to-do the job in the task list of Outlook. Whenever you mark the task as completed, then it will be removed from your task list. The whole process is straightforward and compatible with applying on your system.
In case you wish to add remainder functionality to the mailing tool of MS Outlook, then follow these instructions:
- Choose your desired mail from Outlook.
- Then hit the option “Home.”
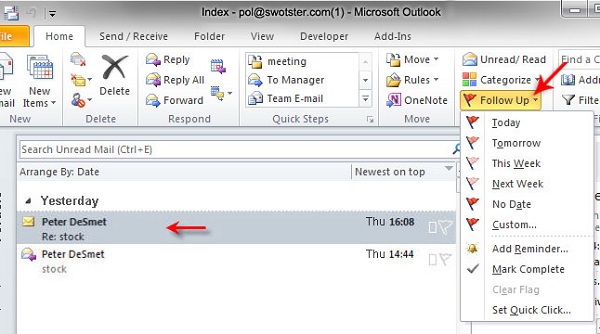
- After that, tap on the “Follow Up” tab. It will be located inside the “Tags” group.
- Navigate to the pull drop menu and then choose the date on which you wish to add a follow-up feature to the particular mail. Microsoft provides various frequent options as follow up feature:
- Today
- Tomorrow
- Next Week
- Alternatively, one can hit the “Custom” option to choose a particular date.
- After selecting the relevant and desired time schedule, the email will be converted to yellow so that you can search your follow-up mail even inside the lengthy listing. Microsoft also adds it to the task pane of your Outlook. It is known as the flag adding process to the particular mail.
- Once you have done all the above steps, you can transfer your mail to any other location or folder. It will also continue to appear on the task list of Outlook. In case you are required to launch the same, hit the double mouse tab on it.
Setting-Up Exact Date and Time for Adding Follow Up to Outlook Email
However, Outlook notifies you on the date that you have selected for mailing your message, but if you wish to set up a fix time and date for the same process, then you can do so. Follow these instructions to do the same:
- First of all, navigate to the Home tab.
- Then, hit the option “Follow Up.”
- Now, tap on the “Add Remainder” option there. This action will expand the Custom section where you can edit and manage various options such as flag’s name, start and end dates, time, and other schedules of the remainder.
- Alternatively, once you launched the “Custom” panel by clicking on the Home tab.
- Then, hit the “Follow Up” option there.
- After that, choose the option “Custom” to expand the editing and customizing panel.
Managing Follow -up Options
- Once you have set up flag name, start and due dates for your follow up the remainder and if you wish to make changes in it, then it’s an easy job.
- The “Flag to” option describes the flag’s name. It’s the name that you have given to your mail. The section displays all the necessary details such as default flag name, start date, and due date of your message, etc.
- In case, you wish to provide any other name to your flag, then hit the pull drop menu and select your desired option. You may also enter your desired name by manual typing.
- If you wish to modify the start and due dates, then select the date by expanding the date menu accordingly. You can also modify the alert sound of your Outlook notification.
- Finally, hit the OK tab to continue and exit from the Custom panel.
Using Quick Action Tools
Quick Access buttons provide frequent accessing features to various options such as flags or manage follow-up features.
- If you wish to access flag, then hit any of the mail that you wish to flag and select the flag option from the pop-out option there.
- In case you haven’t modified default settings of Outlook, then glide your mouse cursor on any of the desired mail, and after a while, you will see a pop-out pane having various follow up options. It will appear as quick access tabs located at the right-hand side section. Then, select the Follow-up flag there.
- Once the quick action tab is clicked, Outlook will create the schedule for “Today” as default. To modify the settings, follow these instructions:
- Press the Home tab.
- Now, hit the “Follow Up” option there.
- Choose “Set Quick Click” for modifying Settings.
- A pull drop menu will appear, select your desired schedule as per your requirements.
- Finally, hit the OK tab to save the changes.
John Smith is a creative person who has been writing blogs and articles about cybersecurity. He writes about the latest updates regarding mcafee.com/activate and how it can improve the work experience of users. His articles have been published in many popular e-magazines, blogs, and websites.
Source:- https://web-mcafee.uk.com/how-to-use-the-follow-up-option-in-outlook/


