If the free space on the hard disk becomes low while using Windows, the processing speed may become extremely slow or the system may become unstable. For speeding up the computer, clean up junk files (files you no longer need) and delete them. So let’s see How to clean junk files in Windows 7.
When the hard disk capacity becomes low, the processing speed may become extremely slow or the system may become unstable. Frequently delete files and programs that you no longer need.
If you want to find temporary Internet files, temporary Windows files, Recycle Bins, downloaded program files, etc. and delete them all at once, the Windows Disk Cleanup tool is useful.
First, click the Start button, then click All Programs> Accessories> System Tools> Disk Cleanup.
Click Disk Cleanup to display the Disk Cleanup Options dialog box, where you can select the files you want to clean up. Here, I selected All user files on this computer.
When the User Account Control dialog box appears, click the Continue button. Next, the [Select Drive] dialog box will be displayed. Select the drive for which you want to perform Disk Cleanup, and click the [OK] button.
Then, the free space created will be calculated. This process will take a few minutes.
After a while, the [Disk Cleanup] dialog box will appear. Select the check box of the file to be deleted.
The files to be deleted by [Disk Cleanup] are as follows.
1. Temporary Internet files
Files that store data such as images of web pages viewed with Internet Explorer so that they can be displayed at high speed on the next visit. It’s okay to delete it, but the next time you visit the web page, it will take some time to redisplay.
2. Temporary file
A file created by Windows and other programs to store temporary information. Disk Cleanup deletes files that haven’t changed for more than 7 days.
3. Downloaded program files
ActiveX control and Java applet files that were downloaded when a particular web page was displayed. It’s okay to delete it, but the next time you visit the web page, it will take some time to re-download.
4. Recycle Bin This
is a temporary storage location when you delete a file. If you delete the file, you cannot restore the file, so check the contents of the “Recycle Bin” before selecting it, just in case.
Click the [OK] button to display the confirmation dialog box. Click the [Delete File] button.
The Advanced Options tab of the dialog box appears in Windows Vista when you select All User Files on This Computer.
Click the Cleanup button in the Programs and Features section to display the Programs and Features dialog box in the Windows Vista Control Panel.
Click the Cleanup button in the System Restore and Shadow Copies section to display a dialog box asking if you want to delete old restore points other than the latest restore points.
* A restore point is a file created periodically or when the system status is changed by [System Restore] of the system tool. You can use this file to restore Windows to a specific point in time.
Click the Cleanup button in the Installed Programs section to display the Add / Remove Programs dialog box.
Click the Cleanup button in the System Restore section to display a dialog box asking if you want to delete other restore points except the latest restore point.


We have all types of windows that you ever need.
From awning windows, picture windows, double slider windows, end vent slider windows, double-hung windows we have it all here at Smart Tech Windows and Doors.
So if you need the best and verities of windows you know where to go.

Aparna Venster is a leading manufacturer of uPVC windows and doors in Hyderabad offering end-to-end solutions that start right from survey to design, fabrication, delivery, installation and maintenance.Venster uPVC windows and doors are the perfect amalgamation of style, durability and performance.
These customizable windows and doors are high on efficiency and low on maintenance and come in a variety of frame, color and lamination options.Choose from casement and sliding windows and doors, slide and fold doors, villa and arch windows, tilt and turn windows or combination windows—whichever best suits your taste and requirements.


When you are looking to find window installation solutions at the heart of Canada, you should consult NorthTech Windows and Doors https://northtechwindows.ca/exterior-doors/ for the most effective solutions.
Whether it is awning windows or casement windows you are looking to buy, you can explore the extensive product catalog offered by NorthTech Windows and Doors for getting top notch products for your home.
One of the best things about buying windows and doors Edmonton offered by the company is that all of their products come with lifetime warranty and this ensures best use of your money.

This post mainly about to fix the Windows update error 8024001f and related error windows update errors in windows 10/8 operating system.
These steps should help with all errors and not just the ones listed.
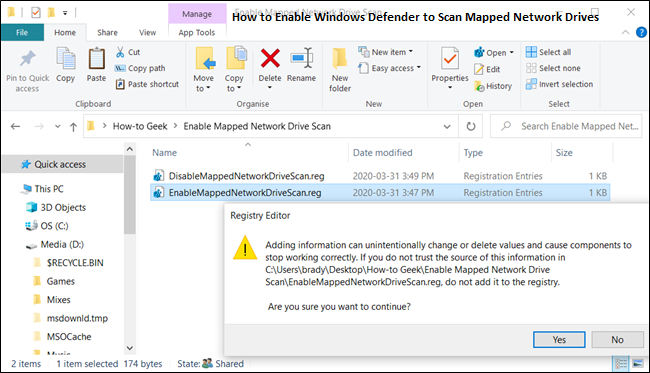
Disclaimers: Before you attempt to fix an issue with the windows update, we highly recommend you to take a registry backup and create a system restore point as a precaution method.
In case if something goes wrong, we can restore your computer to the same stage and fix the issues.
In case Windows 10 automatically download the new drivers or you install the new drivers from the downloaded manufacture’s website.to identify your hardware drivers and find suitable drivers from the manufactures and updated manually.
After Windows Update stops, right-click Windows Update, and then select Start.