The mouse is one of the most important peripheral devices connected to the computer. It used to execute the tasks faster and smoother. Sometimes, users need to change mouse sensitivity or speed as per their desire. If you are also among those who want to change the mouse sensitivity, then this blog is for you. Here we are providing various effective ways to modify the sensitive nature of your mouse.
If you want to change your mouse sensitivity, then follow these instructions:
Changing Sensitivity on Windows 10 Operating System
There are various methods to change the sensitivity of your mouse right on your Windows 10. Let’s explore them in detail.
Default Settings App
- At the start, hit the Window key and “I” button at one go to launch the Settings page.
- Once the Settings page is successfully invoked on your screen, then hit the Devices tab.
- Tap the Mouse button situated at the left-hand side section of your “Devices Settings” window.
- Now, move towards the right-hand side edge and then tap the option “Additional Mouse Options” situated just under the tab “Related Settings.”
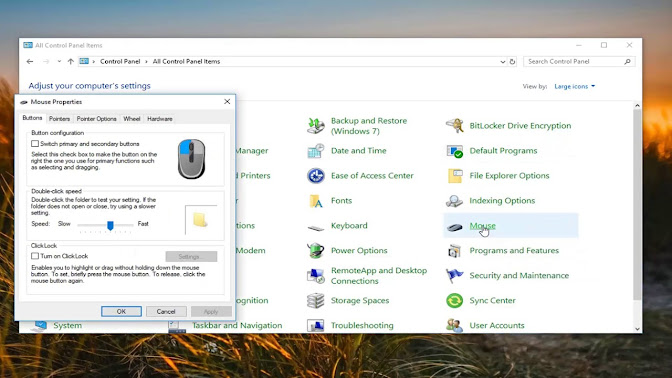
- Once the Mouse Properties Window pops-up on your screen, hit the tab Pointer Options.
- Navigate to the Motion section and then see the option “Select the Pointer Speed.”
- Drag it forward to increase the speed and backwards to minimize.
- Once you find the desired sensitivity level, hit the Apply tab.
- Now, tap the OK button from the lowermost section of the prompt window.
- Reboot the device.
- Congrats! The mouse sensitivity has been changed to your desired level.
Using Registry Hack
- Firstly, hit two keys to launch the Run dialogue box: Win and R.
- Once the “Run” prompt box appears on your window, you have to input “Regedit” and tap the Enter key.
- Now, you will see a separate window of the Registry Editor. Agree to the UAC prompt if it appears.
- Head towards the path located at the left-hand side section:
“//HKEY-CURRENT_USER_Control Panel-Mouse//”
- Now, move towards the right-hand side panel and then perform a double click on the option “MouseSpeed.”
- A prompt will appear having name edit string feature. Now, you have to type “2” into the value data bar.
- Then, tap the OK button to proceed.
- Now, you have to change the value data for MouseThreshold1 and 2 to “0” by applying a double tap on each of them at one go. This process will automatically set the mouse sensitivity to the highest.
Note: You may adjust the speed of your mouse by changing the value data from the relevant section.
Changing Mouse DPI Settings
- DPI settings also affect the mouse sensitivity process. If you are working with gaming mice, then there may be a specific key to change the DPI.
- Changing sensitivity through DPI provides various levels of customizations. However, the procedure of changing the mouse sensitivity through DPI is temporary as it reverts to the previous settings when you shut down your machine.
- These days, the mouse comes with a separate DPI tab for easy accessibility. It can be used to change the mouse speed as per the requirements.
Conclusion
Windows 10 was provided with a new mouse sensitivity feature in its June 1703 edition. One can easily customize the sensitivity of the mouse by using the built-in feature of Windows 10. It is easily accessible by navigating the built-in Settings app. Users have several methods to change the mouse sensitivity such as using the default Settings app, software tweaking, Registry hack, DPI settings and more.
Source :- https://dmogul.com/how-to-change-mouse-sensitivity-on-windows-1


Reports about computer freezing issues never stopped & since October 2017, these problems have been on the rise.
However, it also brought a major hitch with Windows freezing randomly.
Some Common Reasons Why Windows 10 Freezes Randomly:
Excessive Startup Items Running in Background
Fix All The Common Issues In One-Go!
Remove Problematic Programs to avoid Computer Freezes

Drivers play a great role in every Windows device, and they help your device run smoothly with any website or application.
The device’s hardware can’t run without the existence of these drivers on your system disk.
So, it’s always recommended to make them updated by all means.
If you keep your system drivers up to date, then you won’t experience any harmful issues related to the system.Drivers work as a soul for each device, whether it is an internal or external piece or hardware as all these hardware devices need a driver to run.
If the system runs out of outdated drivers, then your machine may face several issues, and then it becomes a difficult task to remove them.Sources :- Update Drivers on Windows 10 , Bloggers-newsPursue these under mentioned guidelines to know how to update a driver especially on Windows 10:Issues due to Outdated or Corrupted DriversIf your device is facing missing drivers, then the related function will get affected.
Users will only allow availing various system updates of Windows 10.