How to Turn Off Windows Defender
Windows Defender is an antivirus program that comes pre-build with Windows 10. Earlier everyone suggests you to have an alternate Antivirus software then what has to Windows offer.
With the release of Windows 10, Microsoft has well improved their Antivirus mechanism (Windows Defender). But still some prefer to go for third party Antivirus software like Kaspersky, McAfee or Avira etc.
In some situation you want temporarily or permanently disable the Windows Defender on your Windows 10. Well, Turning off Windows Defender in Windows 10 is very easy by following this blog you can do it in just 1 mins.
How to Disable Windows Defender in Windows 10
On your Windows 10 device follow the below instruction to disable Windows Defender.
*Press Windows Key on your Keyboard
*Select Setting in the options
*On the Settings Page Select Update & Security
*Now Select Windows Security
*Open Virus & threat protection
*Now click Manage Setting on the Virtus & threat protection Settings.
*Here on the top Switch Real-time protection to Off.
*You will be prompt to confirm press Yes.
That’s it. This is how you can disable windows defender real-time scan on Windows 10 device.
How to Turn off Windows Defender Permanently
By manually turning off the Windows Defender on your device is a temporary process, Windows can automatically turn on the Windows Defender automatically after short period of time.
If you want to disable Windows Defender permanently on your Windows 10 device you can do it either through Group Policy or Registry setting.


Windows Defender is used to protect your data from virus, spyware, malware, and ransomware.
Window Defender comes with Windows 7, 8 and 10.
When we use another security program, then we have to turn off Windows Defender.
So, here are some steps to disable Windows Defender in Windows 7, 8 and 10.Turn off Windows Defender in Windows 10Here is the process of turning off Windows Defender in Windows 10.
Follow the instructions carefully.• First, you will have to press the Start Windows button.• After that launch Settings.• Then tap on “Update and Security.”• After that a tap on Windows Security.• Now, select ” Virus and Threat protection.”• After that, tap on ” Virus and threat protection.”• Click on the blue button and turn off Windows Defender’s real-time scanning.Disable Windows Defender in Windows 10Here is the process of disabling Windows Defender in Windows 10.
Follow the instructions carefully.• First, you will have to launch Start Windows.• If you want to change your computer’s core features, then you must use Registry Editor.• Navigate to the Windows Defender folder’s location.• After that, click right on Windows Defender folder.• Choose New.• Tap on DWORD(32-bit) Value.• Now, type “DisableAntiSpyware” as the file name.• Then double tap on “DisableAntiSpyware” DWORD file.• After that, replace the “Value data” number with 1 and hit OK.• Now, you can reboot your computer.• And finally, Windows Defender turns off.Disable Windows Defender in Windows 8Here is the process of disabling Windows Defender in Windows 8.

We have never doubted the software program that was developed by Microsoft, and their house Antivirus, aka Window Defender, is one of them.
However, several users haven’t disabled the services of Windows Defender.
If you are also one of those users who are facing virus related issues on your device and would like to sneak out them, then follow the below-written methods to attain the knowledge about disabling of Window Defender.
So, here are the steps to permanently turn off Windows Defender Antivirus.
Through Group Policy To launch the Run dialog box by pressing Win + R keys together on your keyboard.After that, enter ‘gpedit.msc.’ select the OK tab to launch ‘Local Group Policy Editor.’You should search the pursuing path: Computer Configuration> Administrative Templates> Windows Components> Windows Defender Antivirus.Go to ‘Turn off Windows Defender Antivirus and twice click on it on the right-hand side panel.Choose the option Enabled, and then click on the Apply button then pick the OK tab.Search: Computer Configuration> Administrative Templates> Windows Components> Windows Defender Antivirus> Real-time Protection.Reach the policy ‘Turn on behavior monitoring.’Choose the option Disabled and select the Apply tab.Click on the OK tab.Navigate to policy ‘Monitor file and program activity on your computer.’Choose Disabled and choose the Apply option then pick the OK tab.Select the policy ‘Turn on process scanning whenever real-time protection is enabled’ and twice click on it.Reach the Disabled tab and choose the Apply option then select the OK tab.Navigate to ‘Turn on behavior monitoring and twice click on it.Later, choose the Disabled tab and select the Apply option then pick the OK tab.Now, reboot the system.Through the RegistryPress Win + R keys together on your keyboard to launch the Run dialog box.Then enter ‘regedit’ then select the OK to launch the Registry.You should search the pursuing: HKEY_LOCAL_MACHINE\SOFTWARE\policies\Microsoft\Windows Defender.Navigate to Windows Defender folder, and right-click on it then choose the New and select the ‘DWORD (32-bit) Value.Input the key name ‘DisableAntiSpyware.’ Then press the Enter key.Go to the key that was freshly created and twice click on it and adjust its value to 1 from 0.Click on the OK tab.Navigate to the folder of ‘Windows Defender’, then select the ‘New’ button and press the key.Input the key name ‘Real-Time Protection’ and hit the Enter button.After that, go to the folder of ‘Real-Time Protection’ and choose the ‘New’ then click on the value of DWORD (32-bit).Rename the key named ‘DisableBehaviorMonitoring.’ Then hit the Enter button.Twice click on the freshly made key and adjust the value from 0 to 1.Press the OK button.Reach folder of ‘Real-Time Protection’ and right-click on it.Choose the New option and press the ‘DWORD (32-bit) Value’.Give a new name to the key named ‘DisableScanOnRealtimeEnable.’ Then hit the Enter button.Twice click on the freshly make key and adjust value to 1 from 0.Finally, hit on the OK key.Through the Security Center Launch ‘Windows Defender Security Center’ on the Windows 10.After that, click on the option ‘Virus and threat protection.’You should select ‘Virus and threat protection settings.’Now, disable ‘Real-time protection’ switch toggle.Richard Branson is a technology enthusiast who loves writing about new advancements and IT threats on a regular basis.
Her work focuses on the latest advancements in the realm of technology, social media, and cyber security at norton.com/setup.

Computer viruses are a security threat and also cause several errors like “ERROR_VIRUS_INFECTED.” This error mainly followed by the “Operation did not complete successfully because the file contains a virus” notification.
In this article will show you how you can easily fix this issue with possible solutions and convenient methods: How to Fix Operation Did Not Complete SuccessfullyChange AntivirusRemoving your antivirus from your operating system is not the best fix, but it can help to fix this issue.
However, sometimes Defender causes the operation did not complete the error.To fix this issue, you need to disable Windows Defender properly on your system.Here are the steps to follow:Tap the Windows + I button on your keyboard to launch the settings application on your device.Under the Settings, select the “Update and security” option, in the left pane, move to the “Window Defender,” and then in the right pane click “Real-time Protection.”After the above process, Window Defender will turn off, and you can run your file without any issue.To completely turn off Windows Defender, you have to edit the registry.Here are the steps to follow:Tap the Windows + R button to open the run command prompt.In the Run command –line type “Regedit” and then tap the “Enter” button or tap “OK.”In the left pane you need to move on:HKEY_LOCAL_MACHINE\SOFTWARE\Policies\Microsoft\Windows Defenderkey.
Locate “DisableAntiSpyware DWORD” in the right pane.
Now type “DisableAntiSpyware” as the new name of DWORD and then double-tap on it.Set the value from 0 to 1 and then click “OK” to save your changes.After the above process Windows Defender will permanently turn off, and you can’t see this error on your device again.If you don’t wish to edit your registry, you can turn off Windows Defender via “Group Policy Editor.”Here are the steps to follow:Tap the Windows + R button on your keyboard and then type “gpedit,msc.” And then, hit the “Enter” button or tap “OK.”When the Group Policy editor appears on the screen, navigate to the left pane and select “Computer Configuration” click “Administration Template” hit Windows Computer” and then click “Windows Defender.In the right pane double-tap on Disable Windows Defender.”Click the “Enable” button and then select “Apply” and hit “OK” to save your changes.Now restart your PC and check for improvement.Add Problematic File into Exclusion ListIf you are facing this error when you are trying to access any files, it is possible that there is a problematic file.
Simply add it to the Exclusion list to fix the problem.Reinstall Antivirus“Operation did not complete successfully” error may occur due to improper installation of antivirus.
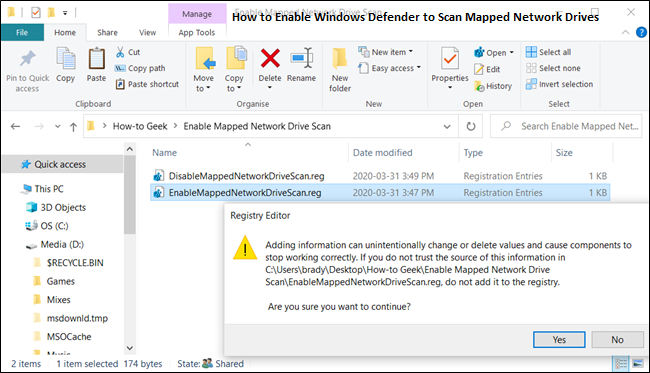
In case you have a mapped network drive on your Windows 10 PC, then Windows Defender will not scan it for potential security risks.
But it is essential to make sure that it is also scanned during every routine scanning of Windows Defender to keep your system safe.For more info: Windows
If your Windows Defender causes up an error notification saying “item skip during the scan,” then the issue occurred due to an item being missed during the scan.
If you have disabled network scanning on your device, then you can also face this issue.
The application settings does not have the ability to control the scanning of your network settings.
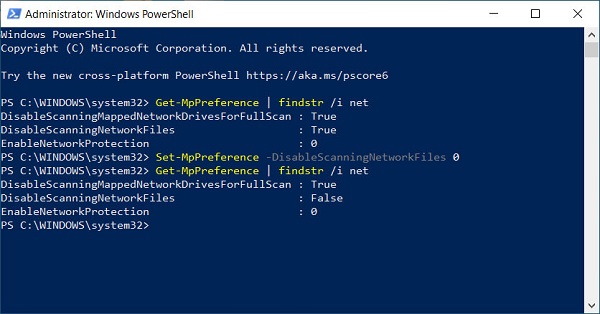
To fix this, you might be needed to enable networking scanning on Windows Defender.How to Enable Network Scanning in Windows DefenderIn this article we will show you how you can enable network scanning in windows defender with three ways and each method will permit network scanning:PowerShellGroup PolicyRegistry EditorAll these methods are depending on which windows version you are using, and you can select one from the above methods.1) PowerShellStart PowerShell along with the admin account.Enter and confirm the command:Set-MpPreference –DisableScanningNetworkFiles 0There is no other output for this command, so you need to copy a file from your network and check you fix this error.If you wish to disable it, then you need to set it 1.2) Group PolicyHere are the steps on how to enable Network scanning in Windows Defender through Group Policy:Launch the group policy editor and the visit to Computer configuration.Tap Administrative temples.Hit Windows components.Tap Windows Defender Antivirus.Tap Scan.Double-tap “Scan network files” and then set it to “Enabled.”Tap Ok.When you have enabled this service, all network files will be scan automatically.Remember that the default setting cannot scan any network files.3) Registry EditorWhen you are using Windows Home, you can also try to check registry value in the group policy that is not available for you.Here you need to launch registry editor and move to:Computer\HKEY_LOCAL_MACHINE\SOFTWARE\Policies\Microsoft\Windows DefenderRight-tap on “Windows Defender” and generate a folder key with the name “Scan” in the scan option.
Here you have to create a new DWORD with “DisableScanningNetworkFiles” and then set it to “0” to enable the scanning.Turn off the Registry.Next, you need to copy the file network; it will automatically scan.You can also copy the shortcut key and import it into another PC to apply rapidly.John Smith is a creative person who has been writing blogs and articles about cybersecurity.
He writes about the latest updates regarding mcafee.com/activate and how it can improve the work experience of users.