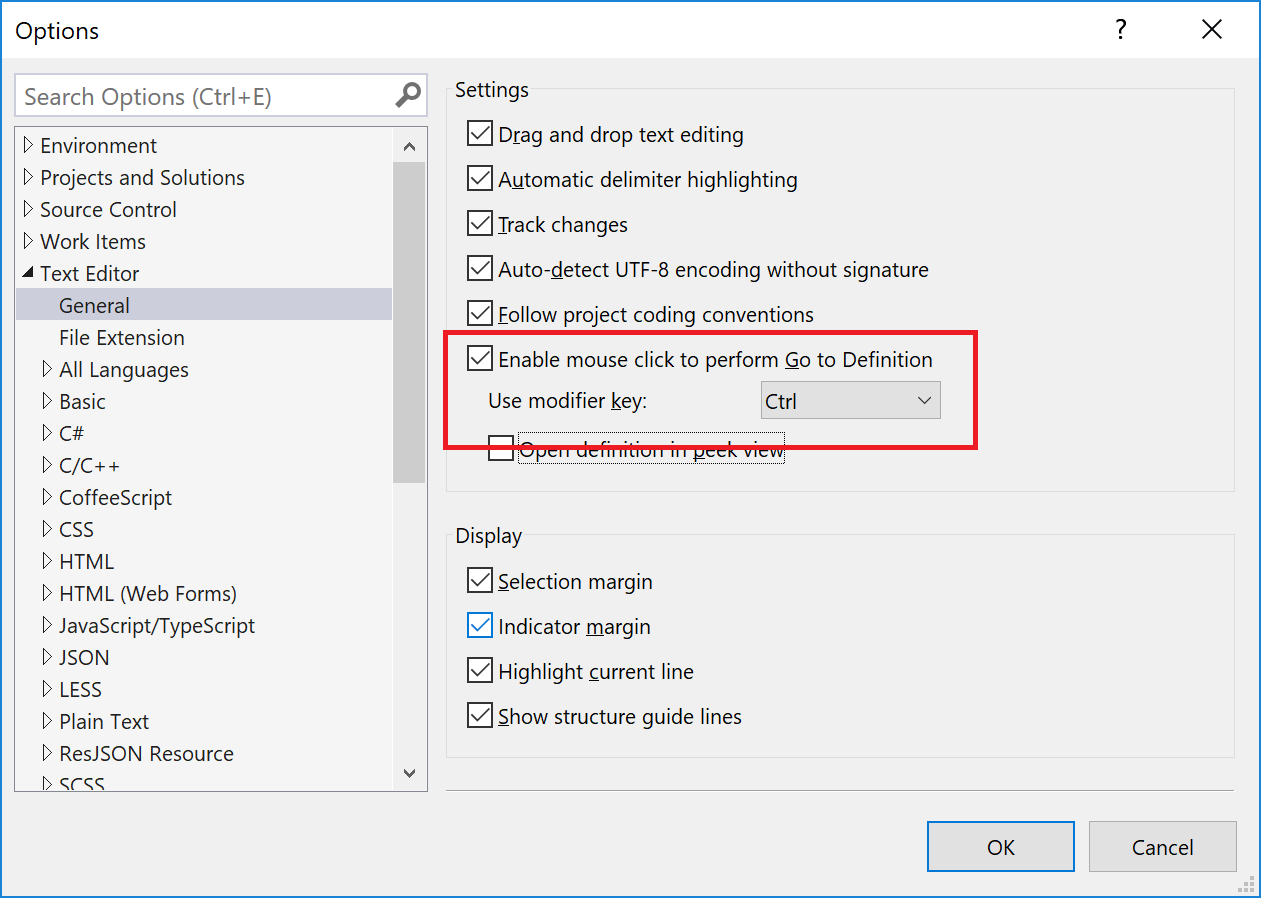
Is the mouse pointer on the Windows 10 device automatically selecting something as you hover over it? In case you are facing this problem, then do not fret. Follow the solutions mentioned above and fix this issue with ease. Let’s check out the ways to turn off mouse hover auto select in Windows 10.
Access the Windows Defender and Scan for Malware
You should follow these directions given below:
- Navigate to the section of Windows Search on your system.
- After that, input ‘Security’ into it and hit the Enter key.
- You should reach the left side menu and choose the ‘Virus and Threat Protection’ option.
- Then go to the right-hand side panel and pick the Scan Options.
- Once it launches, select the Full Scan,and click the Scan Now button.
Use Ease of Access to Fix the Issue
You should follow these directions given below:
- Navigate to the Search section of Windows on your system.
- Then insert ‘control panel’ into it and hit the Enter key to launch the Control Panel.
- Select the Ease of Access.
- After that, move down, and reach the section of ‘Make the mouse easier to use.’
- Check the ‘Make it easier to manage windows’ option.
- Later, uncheck the ‘Activate a window by hovering over it with the mouse’ box.
- Now, select the button of Apply followed by the button of OK to verify the selection.
Disable Tapping on a Touchpad for Laptop
You should follow these directions given below:
- You should select the Windows icon and right-click on it. It will show an options list.
- Thereafter, navigate to the Settings option and select it.
- Click on Devices.
- Now, scroll down the options and select Additional Mouse Options.
- In the screen of ‘Additional Mouse Options’, select the Mouse Properties option and disable tapping.
Install the Touchpad and Mouse Drivers Again
You should follow these directions given below:
- Navigate to the Windows icon and then right-click on it.
- After that, move to the Device Manager, and launch it.
- You should click the option of ‘Mice and other pointing devices’ to extend the section.
- Navigate to the Mouse Driver option and right-click on it for extra options.
- Later, choose the Uninstall Device option.
- Now, you will see a verification screen.
- Click the Uninstall button.
The mouse auto select issue can be frustrating. However, by following the solutions given above, you can fix the issue with ease.
John Hunt is a self-professed security expert; he has been making the people aware of the security threats. His passion is to write about Cyber security, cryptography, malware, social engineering, internet and new media. He writes for Norton security products at norton.com/setup.
SOURCE: How to Disable Mouse Auto Select in Windows 10?


Does your Windows 10 computer keep freezing, randomly and unexpectedly?
This issue can occur due to an array of reasons.
At times, users may experience this issue after updating to the latest version of the Windows 10 OS.
From deleting the temporary system files to conducting a disc check, here are the best solutions to consider when your Windows 10 device freezes randomly.Remove the Temp Files of SystemOpen the Run prompt by tapping Win and R keys simultaneously.Thereafter, insert ‘temp’ init and select the OK button to invoke the Temp folder.Then choose every file given in the folder of Temp and remove them.Set the Virtual MemoryAt first, hold the Windows and Pause keys simultaneously to launch the system information screen.Once you reach that screen, select the ‘Advanced System Settings’ option from the left pane.Navigate to the tab of Advanced, and click on the Settings option.You should reach the tab of Advanced again, and click on the Change button in the section of Virtual memory.Make sure that the ‘Automatically manage paging file size for all drives’ box is not marked.Now, choose the Windows drive, then input the Maximum and Initial size for the virtual memory.After inputting the values of virtual memory, press the Set button and hit on the OK button to proceed.Launch a Memory CheckHit the Windows and R hotkeys altogether over the keyboard to open the Run prompt.After that, input ‘mdsched.exe’ in it and select the OK button.Select the ‘Restart now and check for problems(recommended)’ option.Launch Disk CheckClose all running files and programs on your system.Then hit on the Windows icon to launch the Search section.Go to the ‘File Explorer’ option and click on it.You should click on the This PC icon.After that, find the hard drive you want to check and right-click on it, then pick the Properties option.Thereafter, reach the tab of Tools and choose the Check button.Run SFCTo get started, go to the Search section.Thereafter, input ‘cmd’ in it and hit the OK button to invoke the Command Prompt.Once you see the Command Prompt, right-click on it, then click on the ‘Run as administrator’ option.When the prompt appears, hit on the Yes button.Once you see the black Command Prompt screen, input ‘sfc /scannow’ and hit the Enter key.Now, Windows will scan the computer for damaged files.
Follow the guidelines on the screen.Chloe Decker is a self-professed security expert; she has been making the people aware of the security threats.
Her passion is to write about Cyber security, cryptography, malware, social engineering, internet and new media.

USB is very convenient and handy equipment to share your digital files.
It is best for the user who works on several systems in one day, but it’s very challenging to carry it because it is very small and sometimes people store their essential document in it.
So, most people asked intend to protect their USB drive with a password.
Here are the instructions to password protect a USB drive on Windows 10.Source:-How to Password Protect a USB Drive on Windows?Protect your Drive via BitLockerIf the users are attempting to protect your drive via BitLocker, then they should correctly employ the given instructions.You should connect the USB drive into the system.After that, go to the This PC icon into the Windows Explorer.Then, select the USB drive and right-click on it.You have to choose the ‘Use a password to unlock the drive’ option and input a password double time.Thereafter, click on the Next option.Go to the ‘where or how you would like to get the recovery button in the next screen then choose the Next button.You should click on the ‘Encrypt entire drive’ option and choose Next.Navigate to the ‘Compatible mode’ in the screen of ‘which encryption mode’ and press the Next button.Now, choose the Start encrypting option.Protect your Drive via VeraCryptIf you would like to protect the drive via VeraCrypt, then you can determine to pursue the directions given below.Open the application of VeraCrypt by inputting ‘veracrypt’ into it and choosing the application then pressing return.You should choose the ‘Create Volume’ and pick the “Encrypt a non-system partition/drive”.Go to the ‘Next’ button.Then click on the “Standard VeraCrypt volume” then select the ‘Next’ button.Navigate to the ‘Select Device’ option and click on the USB drive within the devices list that shows and pick the OK button then select Next.In case you are guarding a blank area, choose the “Create encrypted volume and format it” option then pick the Next button.Click on the Encryption Algorithm and Hash Algorithm you would like to use.You should verify the volume space and choose the Next button.Input and verify the password and choose the ‘Next’ button.If you will have bigger files on the part or not, then choose suitably and pick Next.Now, verify the format command then wait for it.
This procedure will take some time, according to the drive size, the data in it then your PC speed.Password Protect Files on USB DriveIf the users are attempting to password protect files on the USB drive, then they should correctly employ the given instructions.You should invoke the document and choose the File option.After that, choose the Protect Document and Info option within the menu options.Go to the option to Encrypt with Password.Now, input the password and then store it.
Harry Martin is a Microsoft Office expert and has been working in the technical industry since 2002.
Among the best part of going to a restaurant or a movie hall is getting a public Wi-Fi access.
But sometimes even after connecting to the Wi-Fi, the sign-in page does not get displayed.
To know how to get back the public Wi-Fi sign-in page, you need to go through this blog carefully.Method 1: Restart the deviceFirstly, you need to disconnect from the network.Then, disable the Wi-Fi.After that, sign-out from the user account.Next, shut down the computer.Then, switch on the computer.After that, sign in to the user account.Next, enable the Wi-Fi.Then, connect to the network one more time.Lastly, check if the sign-in page is now able to display in the browser or not.
Method 2: Go for the another browserFirstly, visit the Start menu.Then, write ‘Control Panel’ into the search bar.
Method 3: Resetting the Network ConnectionFirstly, press the Wi-Fi symbol.
It will be placed on the left-hand side corner of the taskbar.Then, press on the Wi-Fi option to turn it off.After that, switch on the network connection one more time.Switch on the Wi-Fi symbol and the Wi-Fi option one more time.Next, open your browser.Then, try to go to ‘Google.com.’ The sign-in page will now be displayed.Method 4: Updating the Network Adapter DriverFirstly, hold down the combination of Windows symbol+R on your keyboard.Then, write ‘devmgmt.msc’ into the text box.After that, press on OK.Then, move downwards to Network Adapters.Next, press the arrow for expanding the option.After that, right-click on the network adapter.Then, press on the ‘Uninstall device.’ It will be situated in the context menu.Next, reboot the PC.

Cache Manager Error is one of the most infamous BSOD errors, and it mostly shows when you reboot the system frequently.
This error attacks your OS directly,so if you are having trouble with this issue, then you have to follow these instructions given below.Read Full Article Here - How to Fix the Cache Manager Error on Windows 10
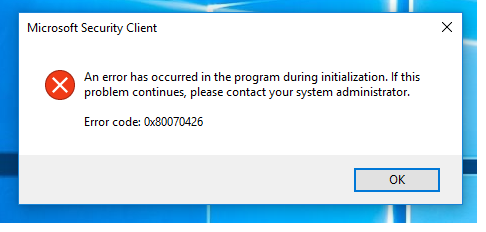
The 0x80070426 error code mostly shows up when the system processes mismatches and initialization issues.
In case Microsoft Essentials used to stay on your device, and you need to update to Windows 10, which provides the security of enhanced Windows Defender, the error could show up.This often happens if the application is not supported by the third-party software you got in your device.
This error can trigger a plethora of other issues in case you ignore it.Fix 1.
Removing Microsoft EssentialsHere is a guide to removing the Microsoft Essentials from your system to fix the 0x80070426 error code:On your system, press the Windows logo + D keys altogether to bring yourself to the desktop screen quickly.
Now press the ALT + CTRL + DELETE Keys at the same time on your computer keyboard.Then head to the Task Manager option to trigger the Windows Task Manager.Look for the option called Windows Defender (Windefend) and then make a right-click on that.Head to End Task.Now head to the start menu by pressing the Windows logo key on your keyboard.Put in the Control Panel and then hit enter.
Uninstall the Windows defender.Fix 2.

Norton setup downloaded from the norton.com/setup page helps to work and explore the ever-changing digital landscape.
Norton makes it as easy to protect and manage your devices while installing an application on your smartphone.